HomeHardwareGuides
How to format a microSD card on the Steam DeckWipe the slate clean. Then slap games on it
Wipe the slate clean. Then slap games on it
Image credit:Rock Paper Shotgun
Image credit:Rock Paper Shotgun

Image credit:Rock Paper ShotgunSteam Deck Academybrings together all our guides and explainers on getting the most out of your Steam Deck, no student loans or sweaty dormitories required.Knowing how to format a microSD card on the Steam Deck is as essential as the card itself. While the Deck is compatible with anymicroSD cardthat meets at least the UHD-I specification – loads, in other words – it doesn’t format them automatically, leaving one final DIY step before your expanded storage card can actually serve as expanded storage. It’s easily done, though, as the shortness of this guide attests.Once your microSD is formatted, you can basically treat it as you would a fully-fledgedSSDin a desktop PC: you can set it as the default drive for installing Steam games, rename it, and move individual games between it and your Steam Deck’s main drive. Or format it again, if (touch wood) there’s ever a technical problem with it. Or you just want to uninstall a bunch of games at once, in a slightly brutish fashion.In any case, formatting only takes a few moments, and is (thankfully) nowhere near as complicated asreplacing the Steam Deck SSDoutright – your alternative route into embiggened handheld game storage.How to format a microSD card on the Steam DeckStep 1:Make sure your microSD card is fully inserted into the Steam Deck’s slot. Obviously.Image credit:Rock Paper ShotgunStep 2:Turn on your Deck and press the Steam button to open the main SteamOS menu. Scroll down to and select “Settings”.Image credit:Rock Paper ShotgunStep 3:Enter the System section, then hit “Check For Updates” and apply if there’s one available. This isn’t always necessary, but there have been reports of Steam Deck owners being unable to format their microSDs unless the system is up to date, so handle that first.Image credit:Rock Paper ShotgunStep 4:Once you’re on the latest software version, it’s time to format. There’s actually a “Format SD card” button right there in the System menu, though weirdly, I’ve found this doesn’t always work. For a more reliable method, leave the System menu and scroll down to the Storage section. Then, highlight your microSD card and press the Y button.Image credit:Rock Paper ShotgunStep 5:Hit “Confirm” when prompted. If you want, you can rename the drive here before confirming, though you can always change it later as well. There’ll be one more window after this; just press “Confirm” again.Image credit:Rock Paper ShotgunAfter a few seconds, your Steam Deck’s microSD will be formatted and ready to stuff to its tiny plastic gills with game installs. On which note, you may wish to set it as the default drive for Steam downloads as well – while you’re in the Storage menu, highlight the microSD and press the X button to make it the default. A little star should appear next to it, confirming the switch.To rename the microSD (or format it again), press the Y button while it’s highlighted, just as you did when first formatting. And, if you want to move games from the internal SSD to the microSD (or vice-versa), highlight one the in the list of games, press Y, and make sure the other drive is selected as the destination. From there, just hit “Move”, then “Close” once the transfer is complete.
Image credit:Rock Paper ShotgunSteam Deck Academybrings together all our guides and explainers on getting the most out of your Steam Deck, no student loans or sweaty dormitories required.Knowing how to format a microSD card on the Steam Deck is as essential as the card itself. While the Deck is compatible with anymicroSD cardthat meets at least the UHD-I specification – loads, in other words – it doesn’t format them automatically, leaving one final DIY step before your expanded storage card can actually serve as expanded storage. It’s easily done, though, as the shortness of this guide attests.Once your microSD is formatted, you can basically treat it as you would a fully-fledgedSSDin a desktop PC: you can set it as the default drive for installing Steam games, rename it, and move individual games between it and your Steam Deck’s main drive. Or format it again, if (touch wood) there’s ever a technical problem with it. Or you just want to uninstall a bunch of games at once, in a slightly brutish fashion.In any case, formatting only takes a few moments, and is (thankfully) nowhere near as complicated asreplacing the Steam Deck SSDoutright – your alternative route into embiggened handheld game storage.How to format a microSD card on the Steam DeckStep 1:Make sure your microSD card is fully inserted into the Steam Deck’s slot. Obviously.Image credit:Rock Paper ShotgunStep 2:Turn on your Deck and press the Steam button to open the main SteamOS menu. Scroll down to and select “Settings”.Image credit:Rock Paper ShotgunStep 3:Enter the System section, then hit “Check For Updates” and apply if there’s one available. This isn’t always necessary, but there have been reports of Steam Deck owners being unable to format their microSDs unless the system is up to date, so handle that first.Image credit:Rock Paper ShotgunStep 4:Once you’re on the latest software version, it’s time to format. There’s actually a “Format SD card” button right there in the System menu, though weirdly, I’ve found this doesn’t always work. For a more reliable method, leave the System menu and scroll down to the Storage section. Then, highlight your microSD card and press the Y button.Image credit:Rock Paper ShotgunStep 5:Hit “Confirm” when prompted. If you want, you can rename the drive here before confirming, though you can always change it later as well. There’ll be one more window after this; just press “Confirm” again.Image credit:Rock Paper ShotgunAfter a few seconds, your Steam Deck’s microSD will be formatted and ready to stuff to its tiny plastic gills with game installs. On which note, you may wish to set it as the default drive for Steam downloads as well – while you’re in the Storage menu, highlight the microSD and press the X button to make it the default. A little star should appear next to it, confirming the switch.To rename the microSD (or format it again), press the Y button while it’s highlighted, just as you did when first formatting. And, if you want to move games from the internal SSD to the microSD (or vice-versa), highlight one the in the list of games, press Y, and make sure the other drive is selected as the destination. From there, just hit “Move”, then “Close” once the transfer is complete.
Image credit:Rock Paper Shotgun
Steam Deck Academybrings together all our guides and explainers on getting the most out of your Steam Deck, no student loans or sweaty dormitories required.
Knowing how to format a microSD card on the Steam Deck is as essential as the card itself. While the Deck is compatible with anymicroSD cardthat meets at least the UHD-I specification – loads, in other words – it doesn’t format them automatically, leaving one final DIY step before your expanded storage card can actually serve as expanded storage. It’s easily done, though, as the shortness of this guide attests.
Once your microSD is formatted, you can basically treat it as you would a fully-fledgedSSDin a desktop PC: you can set it as the default drive for installing Steam games, rename it, and move individual games between it and your Steam Deck’s main drive. Or format it again, if (touch wood) there’s ever a technical problem with it. Or you just want to uninstall a bunch of games at once, in a slightly brutish fashion.
In any case, formatting only takes a few moments, and is (thankfully) nowhere near as complicated asreplacing the Steam Deck SSDoutright – your alternative route into embiggened handheld game storage.
How to format a microSD card on the Steam Deck
Step 1:Make sure your microSD card is fully inserted into the Steam Deck’s slot. Obviously.
Image credit:Rock Paper Shotgun

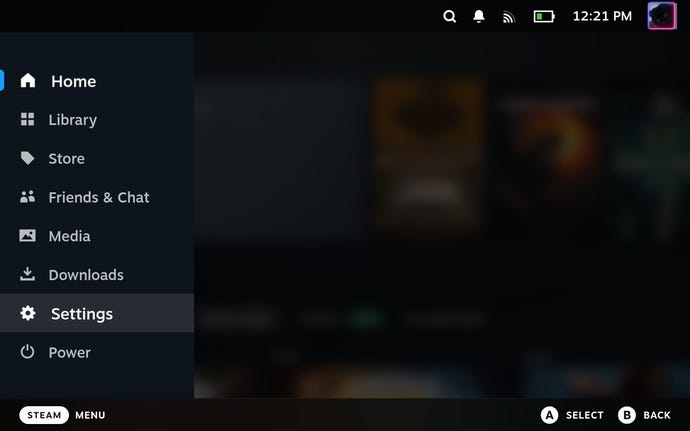
Step 2:Turn on your Deck and press the Steam button to open the main SteamOS menu. Scroll down to and select “Settings”.
Image credit:Rock Paper Shotgun
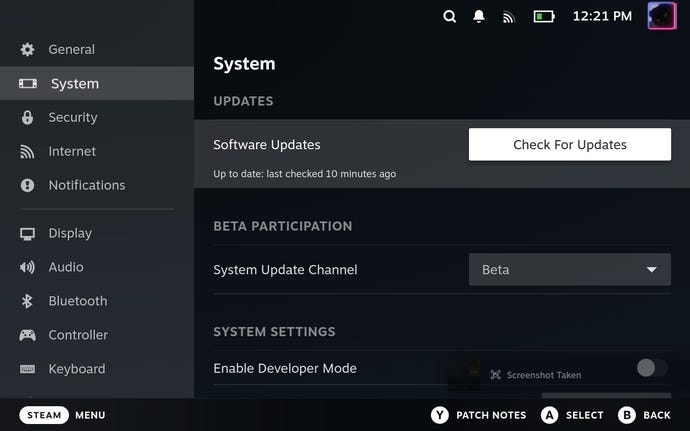
Step 3:Enter the System section, then hit “Check For Updates” and apply if there’s one available. This isn’t always necessary, but there have been reports of Steam Deck owners being unable to format their microSDs unless the system is up to date, so handle that first.
Image credit:Rock Paper Shotgun
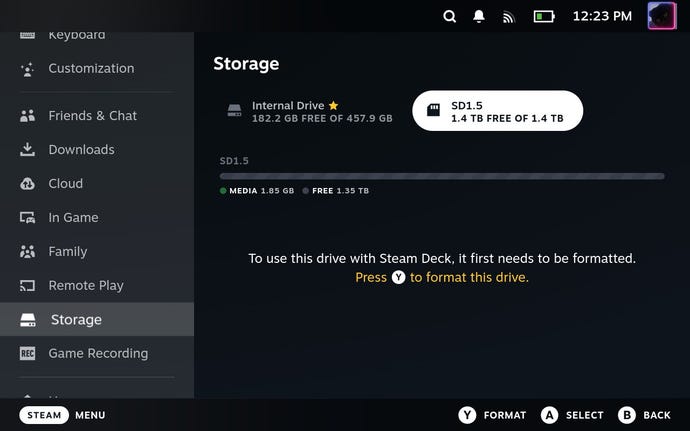
Step 4:Once you’re on the latest software version, it’s time to format. There’s actually a “Format SD card” button right there in the System menu, though weirdly, I’ve found this doesn’t always work. For a more reliable method, leave the System menu and scroll down to the Storage section. Then, highlight your microSD card and press the Y button.
Image credit:Rock Paper Shotgun
Step 5:Hit “Confirm” when prompted. If you want, you can rename the drive here before confirming, though you can always change it later as well. There’ll be one more window after this; just press “Confirm” again.
Image credit:Rock Paper Shotgun
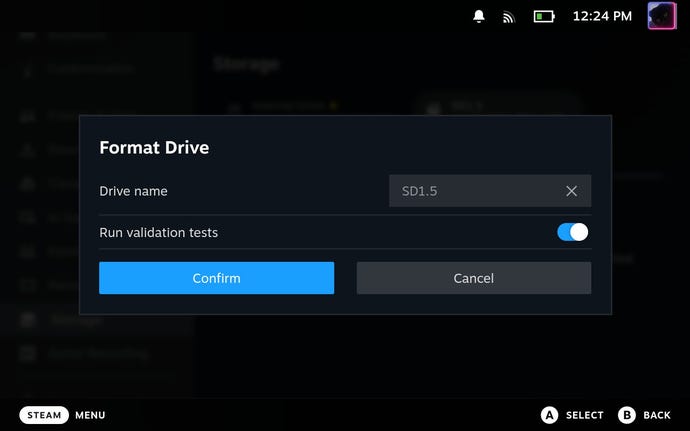
After a few seconds, your Steam Deck’s microSD will be formatted and ready to stuff to its tiny plastic gills with game installs. On which note, you may wish to set it as the default drive for Steam downloads as well – while you’re in the Storage menu, highlight the microSD and press the X button to make it the default. A little star should appear next to it, confirming the switch.
To rename the microSD (or format it again), press the Y button while it’s highlighted, just as you did when first formatting. And, if you want to move games from the internal SSD to the microSD (or vice-versa), highlight one the in the list of games, press Y, and make sure the other drive is selected as the destination. From there, just hit “Move”, then “Close” once the transfer is complete.
