HomeGuidesElden Ring
Elden Ring boss locations: Where to find all 238 Elden Ring bossesUse these maps to find all of the Elden Ring bosses
Use these maps to find all of the Elden Ring bosses
Image credit:Rock Paper Shotgun/Bandai Namco
Image credit:Rock Paper Shotgun/Bandai Namco
Want a list of all Elden Ring bosses, locations and a priority order?Through trial and error we’ve tackled them all (a whopping 238 bosses in total). With so many of these bosses being optional and tucked away in the Lands Between, it can be difficult to find them all. A nightmare for any completionist, and that’s before you even begin factoring in the additional bosses FromSoftware have added with the release of the brand newShadow Of The ErdtreeDLC!
Luckily, we have you covered with a comprehensive list of all boss locations, and a boss order recommendation to help you as you navigate through the rich lands ofElden Ring. Below you’ll find maps covering every region, highlighting the exact location of every one of the Elden Ring bosses. We’ve also written a little bit on each boss encounter to help you find and strategise against each of these adversaries.
Note: heavy spoilers follow. You’ve been warned.
12 Elden Ring Tips And Tricks To Help You Easily Conquer The First 10 HoursWatch on YouTube
12 Elden Ring Tips And Tricks To Help You Easily Conquer The First 10 Hours

Elden Ring boss locations
1of9CaptionAttribution
1of9
1of9
1of9
CaptionAttribution


CaptionAttribution
Caption
Attribution
In this guide:
Elden Ring boss order
With such a dizzying number of boss encounters available to players in Elden Ring, it can be confusing to figure out the order in which FromSoftware intended you to fight them. The truth is: there is no clear boss order. The beauty of the open world is that you can go off and fight whoever you like, in whatever order you wish.
But if you want a true boss order list to follow, then here’s our recommended boss order for the essential and important bosses of the game.
Elden Ring boss order:
Obviously there are a great many more bosses in the game, but to try and put an order to them would be a bit silly, because the point is simply to try to fight them, and if they’re too hard for you in your current state, you can head elsewhere and fight something else.
Below you can read more about each of the hundreds of boss encounters in Elden Ring. Use the links above to skip ahead to the region of your choice.
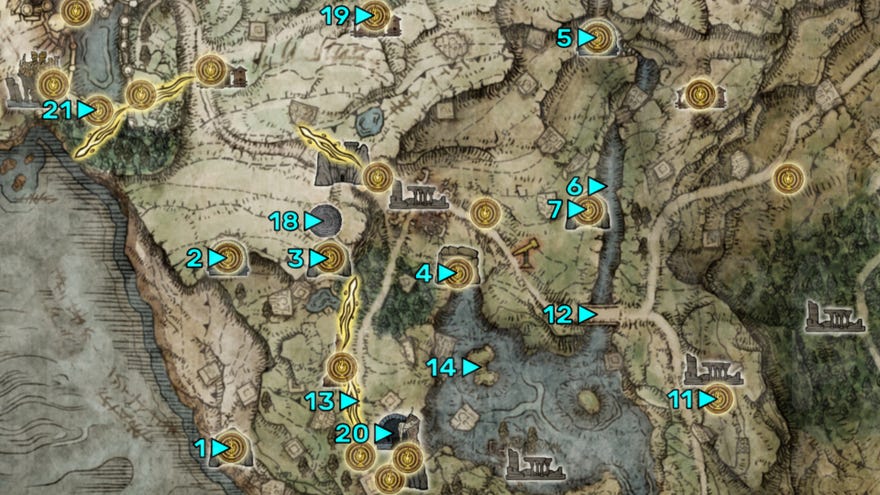
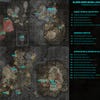
Elden Ring bosses: Limgrave and Weeping Peninsula
Use this map to find out the exact locations of every boss in Limgrave and the Weeping Peninsula. Be sure to view it atfull resolution!Image credit:Rock Paper Shotgun/Bandai Namco

Grafted Scion (Chapel Of Anticipation)
The Grafted Scion is one of the nastier early-game Elden Ring bosses, with its many hands allowing for long combos of far-reaching sword attacks. Either use a big shield to soak up these attacks before striking, or time your dodges through his attacks so you can strike from behind.
Soldier Of Godrick (Tutorial Boss)
Players starting a new game of Elden Ring will likely face the Soldier of Godrick in the Cave of Knowledge. This swordsman is barely tougher than the standard soldiers you’ll encounter out and about in Limgrave, so it’s hardly a boss at all. But I’m mentioning it here for completion’s sake.
Demi-Human Chiefs (Coastal Cave)
Elden Ring Boss Guide - Demi-Human ChiefsWatch on YouTube
Elden Ring Boss Guide - Demi-Human Chiefs

Burial Tree Watchdog (Stormfoot Catacombs)
Elden Ring Boss Guide - Erdtree Burial WatchdogWatch on YouTube
Elden Ring Boss Guide - Erdtree Burial Watchdog

Found at the end of the Stormfoot Catacombs, the Burial Tree Watchdog loves to float into the air and slam down on top of you. Its attack patterns are easy to grasp, however, and its health pool is quite low, so this boss should be a piece of cake compared to later encounters.
Beastman of Farum Azula (Groveside Cave)
The Beastman ofFarum Azulacan be found lurking past the wolves in Groveside Cave. He’s an unpleasant-looking individual with a nasty-looking curved greatsword and a love of long combos. Fortunately, he has low poise and is easily parried, leading to an easy early boss fight.
Stonedigger Troll (Limgrave Tunnels)
Elden Ring Boss Guide - Stonedigger TrollWatch on YouTube
Elden Ring Boss Guide - Stonedigger Troll

Stonedigger Troll may look mighty, but with the right setup (i.e. a magical setup) he’s a pushover. He resides at the end of the Limgrave Tunnels dungeon, and while his attacks are painful if they land, one can easily stay out of his range and pummel him with spells.
Check out ourElden Ring Stonedigger Troll boss fight walkthroughfor more details.
Grave Warden Duelist (Murkwater Catacombs)
Elden Ring Boss Guide - Grave Warden DuellistWatch on YouTube
Elden Ring Boss Guide - Grave Warden Duellist

You’ll have to fight through a nasty little dungeon of imps hiding behind corners to get to the Grave Warden Duelist; but he’s actually not that bad once you’ve enlisted the aid of your Spirit Ashes. Even after he powers himself up, he doesn’t hit terribly hard, and his attacks are easily blocked and weathered with a shield.
Bloody Finger Nerijus (Agheel River)
Elden Ring Boss Guide - Bloody Finger NerijusWatch on YouTube
Elden Ring Boss Guide - Bloody Finger Nerijus

Bloody Finger Nerijus may give you a bit of trouble at first if you are caught unaware. He appears as you head up the river from Agheel Lake, past the bridge, and will attack you with a combination of melee and ranged bleed attacks. Fortunately, a mysterious stranger comes to aid you if you last long enough.
Check out ourElden Ring Bloody Finger Nerijus boss fight walkthroughfor more details.

Patches (Murkwater Cave)
An inside joke for many a FromSoft veteran, Patches is a simple mercenary boss who will surrender after you deal enough damage to him. You can find him at the end of the very short dungeon, Murkwater Cave - but it’s important that you do find him, because if you spare his life, he’ll open up a shop where you can purchase an item that will help you ina certain important future fight…
Guardian Golem (Highroad Cave)
The Guardian Golem of Highroad Cave may seem tough at first, but once you’ve cracked the secret to this boss fight, it’s a walk in the park. Bring a blunt weapon and target the feet with heavy attacks to bring it crashing down to the ground, primed for a critical hit to the chest.
Black Knife Assassin (Deathtouched Catacombs)
Elden Ring Boss Guide - Black Knife AssassinWatch on YouTube
Elden Ring Boss Guide - Black Knife Assassin
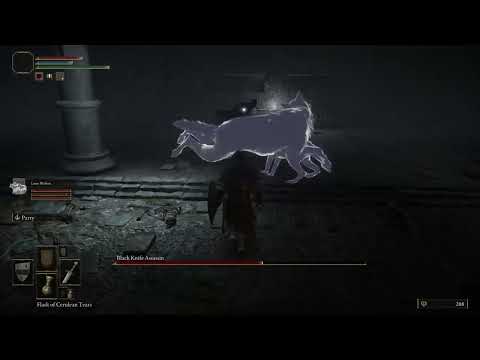
The Black Knife Assassin is a slippery customer who you can find at the end of the Deathtouched Catacombs towards the north of Limgrave. He is fond of dodging back, and waiting for the right moment to strike - but his attacks themselves aren’t terribly strong, so you can block him with ease and slowly cut his health bar down to size with some patience.
Recusant Henricus (Colosseum Road)
Recusant Henricus invades as you walk towards the Limgrave Colosseum, located northeast of Stormhill Shack. He uses heavy melee attacks which deal lots of damage upon impact, but you’ll find they’re also rather slow. To make light work of Henricus, equip a fast melee weapon, such as a Dagger, and whittle down his health while rolling to avoid any damage.
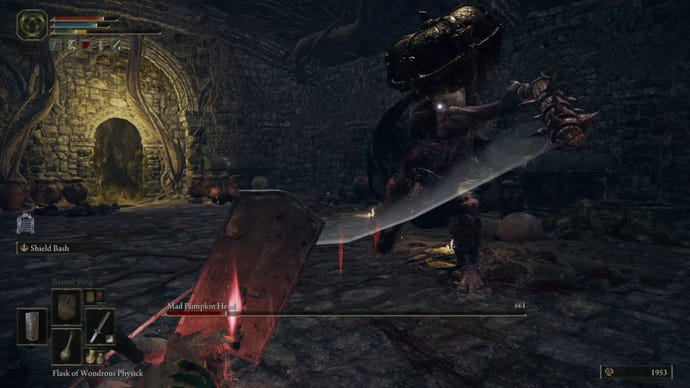
Mad Pumpkin Head (Waypoint Ruins)
The Mad Pumpkin Head resides in the cellar beneath Waypoint Ruins, and guards the room whereSorceress Sellenlives, ready to impart sorcerous knowledge to the player. The Mad Pumpkin Head loves to headbutt you, and slash at you with its bleed-inflicting flail. Take your time, don’t get greedy with your attacks, and you’ll be fine.
Night’s Cavalry (Highway Bridge)
Tree Sentinel (Church Of Elleh Road)
Elden Ring Boss Guide - Tree SentinelWatch on YouTube
Elden Ring Boss Guide - Tree Sentinel

The Tree Sentinel is like an even harder version of Night’s Cavalry (above). He’s also likely to be the first true boss you encounter in Elden Ring, as he’s in plain view as you enter Limgrave for the first time. He’s a tough foe in the early-game; I’d advise using Torrent and distracting the Sentinel with a good choice of Spirit Ashes.
Check out ourElden Ring Tree Sentinel boss fight walkthroughfor more details.
Flying Dragon Agheel (Agheel Lake)
Elden Ring Boss Guide - Flying Dragon AgheelWatch on YouTube
Elden Ring Boss Guide - Flying Dragon Agheel

Flying Dragon Agheel has the most wow-factor of any of the Limgrave-based Elden Ring bosses - but it’s actually not terribly hard to deal with as long as you stay on horseback throughout the fight. Agheel will fly down into the centre of the lake as you approach, belching flames and smacking at you with its tail, but its powerful attacks are clearly telegraphed and easily avoided.
Tibia Mariner (Summonwater Village)
Elden Ring Boss Guide - Tibia MarinerWatch on YouTube
Elden Ring Boss Guide - Tibia Mariner

The Tibia Mariner is a curious boss that summons undead skeletal enemies to fight alongside it will it teleports about Summonwater Village. The Mariner itself will mostly just sit there and let you slash at it, only occasionally rearing up to slam into the ground. So ignore the minions and prioritise the Mariner to end this fight quickly.
Anastasia, Tarnished-Eater (Smoldering Church)
Elden Ring Boss Guide - Anastasia Tarnished EaterWatch on YouTube
Elden Ring Boss Guide - Anastasia Tarnished Eater

Anastasia, Tarnished-Eater is another invader like Bloody Finger Nerijus; you’ll meet her as you approach the Smoldering Church on the border between Limgrave and the far more dangerous Caelid Wilds to the east. Take your time fighting this opponent: it’s easy to stay out of her range, but one wrong move could mean the end thanks to her deceptively powerful attacks.
Bloodhound Knight Darriwil (Forlorn Hound Evergaol)
Elden Ring Boss Guide - Bloodhound Knight DarriwilWatch on YouTube
Elden Ring Boss Guide - Bloodhound Knight Darriwil
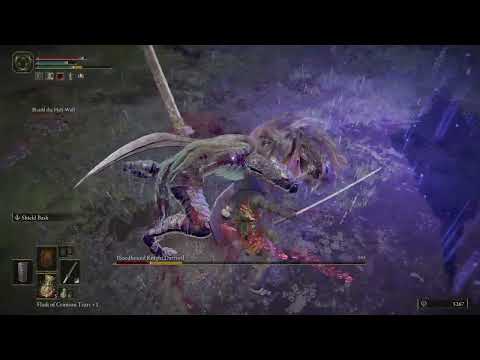
Bloodhound Knight Darriwil resides inside the Forlorn Hound Evergaol to the south of Limgrave. Enter the Evergaol to face him, and you’ll find him to be a quick and aggressive warrior who may provide a significant challenge to a new player. Fortunately, you can call upon a certain friend to aid you if you know how.
Check out ourElden Ring Bloodhound Knight Darriwil boss fight walkthroughfor more details.
Crucible Knight (Stormhill Evergaol)
Elden Ring Boss Guide - Crucible KnightWatch on YouTube
Elden Ring Boss Guide - Crucible Knight

The Crucible Knight gave me more trouble than any boss I’ve mentioned so far during my first playthrough. Awaiting you inside the Stormhill Evergaol, this ominous armoured warrior has unexpected timings on his attack combos, and deals lots of damage with every swing. He also begins to use angelic wings and holy attacks during his intense second phase.
Check out ourElden Ring Crucible Knight boss fight walkthroughfor more details.
Bell Bearing Hunter (Warmaster’s Shack)
The Bell Bearing Hunter is a very powerful opponent who appears in place of Knight Bernahl in Warmaster’s Shack when you approach at night. The Bell Bearing Hunter is a tough warrior who can telekinetically control his sword to unleash dangerous mid-range attacks. The easiest way to defeat him is to stay out of his range and pummel him with spells or arrows until he falls.
Deathbird (Warmaster’s Shack East)
Old Knight Istvan (Volcano Manor Contract)
Old Knight Istvan is the first of the enemies whose worlds you are contracted to invade as part of theVolcano Manorquestline at Mount Gelmir. He’s a fairly straightforward swordfighter; his only real quirk, besides his love of dodge-rolling, is a gravitational AoE attack which pulls you towards him if you’re too slow at getting out of range. Not a terribly difficult fight.
Grafted Scion x2 (Fringefolk Hero’s Grave)
In the challenging Fringefolk Hero’s Grave, once you reach the portion of the walkway with the narrow ramp, you can drop off the side onto a hidden platform below, which takes you to a separate area of the dungeon. At the end of this section is a bridge. If you cross this bridge, two Grafted Scions will drop from the ceiling and attack you. This is quite a difficult fight for anyone who hasn’t yet progressed beyond Limgrave, so I’d recommend leaving these Scions alone until later on if you have trouble beating them.
Ulcerated Tree Spirit (Fringefolk Hero’s Grave)
Elden Ring Boss Guide - Ulcerated Tree SpiritWatch on YouTube
Elden Ring Boss Guide - Ulcerated Tree Spirit

The Ulcerated Tree Spirit, despite being accessible very early on in Fringefolk Hero’s Grave, is one of the toughest bosses in all of Limgrave (including the main bosses of the region). Its movements are erratic, designed to obfuscate its very powerful attacks; and it can soak up quite a lot of punishment too. I would recommend leaving this boss alone until you’ve completed pretty much everything else in the region.
Ulcerated Tree Spirit (Stormveil Castle)
Interestingly, you can also find another Ulcerated Tree Spirit dwelling belowStormveil Castle. To get there, head to the Secluded Cell Site of Grace, head into the pots area opposite, but then double back and climb up onto the ledge above the doorway, and jump through the window to the side. From there, follow the new path down and it’ll eventually take you to a whole new part of Stormveil Castle.
Check out ourElden Ring Ulcerated Tree Spirit boss fight walkthroughfor more details.
Crucible Knight (Stormveil Castle)
An exact copy of the Crucible Knight you encountered in the Stormhill Evergaol can be found in a very well-hidden area of Stormveil Castle. Just after the Rampart Tower Site of Grace, kill the three birds hauling explosive barrels, then jump off the jutting out portion of the ledge to the left. Follow the path and it’ll lead you to another Crucible Knight.
Check out our Elden RingCrucible Knight boss fightwalkthrough for more details.
Grafted Scion (Stormveil Castle)
Margit, The Fell Omen (Stormveil Castle)
Elden Ring Boss Guide - Margit, the Fell OmenWatch on YouTube
Elden Ring Boss Guide - Margit, the Fell Omen

Check out ourElden Ring Margit boss fight walkthroughfor more details.
Godrick The Grafted (Stormveil Castle)
Elden Ring Boss Guide - Godrick the GraftedWatch on YouTube
Elden Ring Boss Guide - Godrick the Grafted

Godrick the Grafted is the Lord of Stormveil Castle, and the main boss of Limgrave. So as you might imagine, he’s far from a pushover. Like Margit, Godrick utilises aggressive combo attacks which require lots of successive dodging; and his second phase gives him the use of a dragon’s head as an arm, which acts as a flamethrower that you should be very careful about approaching.
Check out ourElden Ring Godrick the Grafted boss fight walkthroughfor more details.
Burial Tree Watchdog (Impaler’s Catacombs)
The Burial Tree Watchdog from Stormfoot Catacombs makes another appearance to the far east of the Weeping Peninsula in the hidden away Impaler’s Catacombs. This fight is identical to the other Watchdog fight, with the exception that in this arena there are also several little Imp creatures to harass you while you fight. I’d recommend picking them off first.
Runebear (Earthbore Cave)
Night’s Cavalry (Castle Morne Rampart)
As you approach Castle Morne at night, you’ll encounter another Night’s Cavalry like the one guarding the Highway Bridge up in Limgrave. This Night’s Cavalry variant wields a Nightrider Flail which he drops on death for you to use. Otherwise, he’s functionally identical to the other Night’s Cavalry.
Deathbird (Castle Morne Outskirts)
Cemetary Shade (Tombsward Catacombs)
Elden Ring Boss Guide - Cemetery ShadeWatch on YouTube
Elden Ring Boss Guide - Cemetery Shade

The shadowy Cemetary Shade can be found at the end of the Tombsward Catacombs. Wielding dual-blades and capable of disapparating into shadowy mist at will, it can be hard to pin down the Cemetary Shade. But once you do, you’ll find that it actually has very little health, so this fight shouldn’t take too long.
Erdtree Avatar (Minor Erdtree)
Elden Ring Boss Guide - Erdtree Avatar (Weeping Peninsula)Watch on YouTube
Elden Ring Boss Guide - Erdtree Avatar (Weeping Peninsula)

Erdtree Avatars guard most Minor Erdtrees found across The Lands Between in Elden Ring. The Erdtree Avatar in the Weeping Peninsula is the least of all of them, but it still packs a hell of a punch. Utilise fire and Spirit Ashes as a distraction; and be careful also to run sideways to avoid its multiple golden spells attack.
Scaly Misbegotten (Morne Tunnel)
Elden Ring Boss Guide - Scaly MisbegottenWatch on YouTube
Elden Ring Boss Guide - Scaly Misbegotten

Scaly Misbegotten is a boss who quickly becomes a normal enemy as you progress further into the game; but they’re always a tough adversary whenever you meet them. These tough enemies wield a massive greataxe and delay their strikes longer than you might think, daring you to dodge-roll too early and be punished for it.
Miranda The Blighted Bloom (Tombsward Cave)
Miranda The Blighted Bloom is a giant poisonous magical flower, and the first of many that you’ll encounter later on in Elden Ring. She and her brethren spew poisonous clouds at you, and Miranda herself can call an easily avoidable magical rain down upon an area. Fire attacks make this miniboss easy - even just a torch will do a good job of interrupting her poison attacks.
Ancient Hero Of Zamor (Weeping Evergaol)
Elden Ring Boss Guide - Ancient Hero of ZamorWatch on YouTube
Elden Ring Boss Guide - Ancient Hero of Zamor

The Ancient Hero of Zamor lies within the Weeping Evergaol, which is the Weeping Peninsula’s only Evergaol. This tall figure utilises a hooked blade and cold attacks, so naturally you should use fire damage if you have it. Dodge around its cold breath attack and hit it from behind for lots of damage.
Leonine Misbegotten (Castle Morne)
Elden Ring Boss Guide - Leonine MisbegottenWatch on YouTube
Elden Ring Boss Guide - Leonine Misbegotten

Leonine Misbegotten is the toughest enemy in the Weeping Peninsula, and the boss of Castle Morne. You’ll find him on the beach below the castle. He is a powerful and aggressive boss who loves to wear down your stamina with repeated combo attacks, so you’d best bring something to upset his rhythm.
Check out ourElden Ring Leonine Misbegotten boss fight walkthroughfor more details.
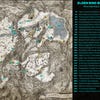
Elden Ring bosses: Liurnia of the Lakes
Use this map to find out the exact locations of every boss in Liurnia of the Lakes. Be sure to view it atfull resolution!Image credit:Rock Paper Shotgun/Bandai Namco

Cleanrot Knight (Stillwater Cave)
The imposing, metalclad, cape-wearing Cleanrot Knight can be found in the final room of Stillwater Cave. He’s a dangerous foe wielding dual spears, and it doesn’t help that you must fight him in an area flooded with poisoned water. Bring whatever you can to increase your immunity stat, and watch out for his cross-blade guard counter.
Adan, Thief Of Fire (Malefactor’s Evergaol)
Elden Ring Boss Guide - Adan, Thief of FireWatch on YouTube
Elden Ring Boss Guide - Adan, Thief of Fire

Adan, Thief Of Fire is the prisoner inside the Malefactor’s Evergaol a short distance down the left path behind Stormveil Castle. As such, he’s a very early boss to contend against in Liurnia - and he’s not too terribly difficult to face. He packs a punch with his flail, and you’ll need to watch out for his quick fire attacks, but his low health and low poise make it an easier fight than many on this list.
Tibia Mariner (East Liurnia)
The Tibia Mariner is a boss fight that you’ll likely encounter several times during your treks across the Lands Between. There was one to be found in Limgrave; another is here, a short distance south from the Carian Study Hall. This Tibia Mariner is of a higher calibre than the Limgrave variant, capable of summoning a giant half-buried skeleton for a short time. But it’s still a cakewalk on horseback; just stay away from the real threats and whale at the Mariner until it is defeated.
Night’s Cavalry (Gate Town Bridge)
Yep, Night’s Cavalry are a thing in Liurnia of the Lakes as well as Limgrave. This Night’s Cavalry is marginally more powerful than its preceding brethren in this list, simply because of the region-based difficulty scaling. But functionally, it is identical to the others, with much the same moveset.
Preceptor Miriam (Carian Study Hall)
Elden Ring Boss Guide - Preceptor MiriamWatch on YouTube
Elden Ring Boss Guide - Preceptor Miriam

Preceptor Miriam guards the aforementioned Carian Study Hall on Liurnia’s eastern edge. If you can get up to her, you’ll find that your attack will easily interrupt hers, and she doesn’t have much in the way of melee capabilities. But her ranged magical attacks are very powerful if they hit, so you’ll need to time your dodges well. You’ll also need to fight her twice: once in the ordinary Study Hall, and once in the inverted Study Hall. Check out our guide to theDivine Tower of Liurniafor more details.
Godskin Noble (Divine Tower Bridge)
Once you fight your way past Preceptor Miriam in the Inverted Study Hall, you’ll arrive on the Divine Tower Bridge. Halfway down this bridge, a Godskin Noble enemy will appear in front of you. While not technically a boss (as in, there is no boss health bar), I’m including it here for two reasons. One: it doesn’t respawn. And two: it’s a good deal stronger than a lot of Elden Ring bosses you’ll encounter in this region.
The Godskin Noble is fond of throwing fire, and stabbing at you an awful lot with his rapier. He’s deceptively quick, and has a lot of health to whittle away at, making him a very dangerous foe.
Deathbird (Scenic Isle)
Just like Night’s Cavalry, the Deathbird is another recurring nighttime-only boss which you’ll find in both Liurnia and Limgrave. If you saw either of the Deathbirds in Limgrave, you know what you’re in for with this fight around the ruins north of the Scenic Isle Site of Grace.
Bloodhound Knight (Lakeside Crystal Cave)
At the end of the Lakeside Crystal Cave at the bottom of Liurnia’s lake, you’ll find a Bloodhound Knight who is more or less identical toBloodhound Knight Darriwilfrom Limgrave’s Forlorn Hound Evergaol. Sweeping sword strikes and quick claw attacks make this boss more fearsome than you might expect, but you can quite easily stagger him with heavy attacks.
Crayfish/Grafted Scion (Fallen Ruins Of The Lake)
Another enemy that isn’t technically a boss but is still worth mentioning: a short distance south of the Fallen Ruins Of The Lake Site of Grace (which is in the middle of Liurnia’s lake itself), you’ll find a Giant Crayfish wandering about. Crayfish are dangerous at the best of times with its claw and spray attacks, but this particular one is special, because once you kill it, a Grafted Scion will spawn in its place.
Defeat both to claim a Larval Tear - a rare item that is the key to the ability torespec in Elden Ring.
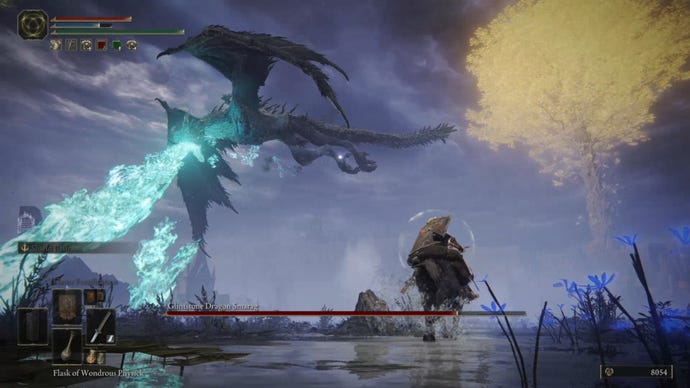
Glintstone Dragon Smarag (Temple Quarter)
Glintstone Dragon Smarag is another notable inhabitant of the lake surrounding the Raya Lucaria Academy. It can be found at the bit of land just to the west of the Academy itself, and it is guarding theGlintstone Keythat you’ll need in order to get into said Academy.
Much like Flying Dragon Agheel, you should tackle Glintstone Dragon Smarag carefully and patiently, and on horseback to make things easier. Smarag is capable of bursts of Glintstone magic, but you can avoid them as easily as any dragon’s breath attack. Hack and slash at its legs until it goes down.
Check out our Elden RingGlintstone Dragon Smarag boss fightwalkthrough for more details.
Crystalians (Academy Crystal Cave)
The Crystalians found at the end of the Academy Crystal Cave (accessible from the lake) are a duo of enemies made from pure crystal. As such, they’re almost impervious to many different types of damage, but they’re vulnerable to blunt attacks, so make sure you bring a weapon capable of inflicting strike damage for this fight.
Fighting a pair of bosses can be very difficult, but in this case it’s not terrible because the Ring Blade Crystalian tends to stay at range, while the spear-wielding Crystalian likes to close the gap between you. Use this knowledge to separate them as much as possible, and take them out one at a time.
Death Rite Bird (Gate Town North)
The fearsome Death Rite Bird can be found in a swampy clearing abutting the eastern side of the Academy, and only appears at nighttime. Don’t underestimate this adversary: it can mess you up with its unusual AoE black flame attacks, and sweeping melee strikes that make it hard to play around it on horseback. I’d advise bringing a weapon with thesacred affinity.
Ring Blade Crystalian (Raya Lucaria Crystal Tunnel)
Bell Bearing Hunter (Church Of Vows)
Erdtree Avatar (East Minor Erdtree)
Cemetary Shade & Black Knife Assassin (Black Knife Catacombs)
You’ll have encountered both these bosses in Limgrave, but the Black Knife Assassin in particular is more dangerous than before, making it clear that the one you faced in the Deathtouched Catacombs is far from the strongest Black Knife Assassin in Elden Ring. Nor is this one, but, well… We’ll deal with that later.
Festering Fingerprint Vyke (Church Of Inhibition)
Festering Fingerprint Vyke seemingly invades your world at the Church Of Inhibition only if you’ve reached the fourth stage ofHyetta’s quest(the woman who asks for Shabriri Grapes). Vyke is a fairly straightforward invader, with an aggressive playstyle and a long-ranged spear. His attacks build up your madness meter fairly quickly, so if you’re hit two or three times in a row you’re likely to die there and then as a result of the madness and accompanying stun. So play it patiently, and use heavy attacks to interrupt his thrusts.
Night’s Cavalry (Bellum Highway Forest)
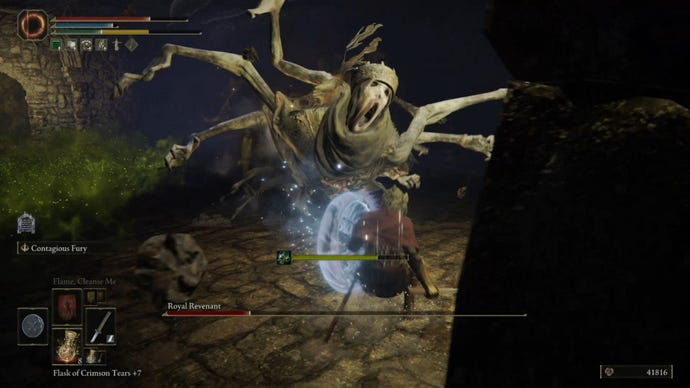
Royal Revenant (Kingsrealm Ruins Underground)
The Royal Revenant is not to be sniffed at. It’s a version of the powerful Swamp Lord enemy that guards the Laskyar Ruins in the lake, as well as certain ruins up in the Moonlight Altar. It has low health, but it’s a scary boss with long combos of fast and powerful attacks which make it very hard to avoid all damage. However, it has a huge weakness: using AoE heals in its vicinity will deal massive damage and stun it instantly.
Bols, Carian Knight (Cuckoo’s Evergaol)
Elden Ring Boss Guide - Bols, Carian KnightWatch on YouTube
Elden Ring Boss Guide - Bols, Carian Knight

Bols, Carian Knight, resides inside the Cuckoo’s Evergaol to the west of Liurnia’s lake. Bols is a variant of the simple giant enemy; this one has a sword and a cape, and is better trained for combat. It also knows the basic but effective Glintstone Phalanx sorcery, so you’ll have to learn to time your dodges to avoid both Bols’s strikes and the magical daggers flying towards you.
Edgar The Revenger (Revenger’s Shack)
Erdtree Avatar (West Minor Erdtree)
Spirit-Caller Snail (Road’s End Catacombs)
The intriguing Spirit-Caller Snail can be found in the Road’s End Catacombs, behind a series of illusory walls starting just under the first staircase in the dungeon. The Snail itself is a weedy little enemy, but it remains invisible most of the time, calling upon powerful spirits to fight you one at a time. After defeating a spirit, the Snail will reveal itself for a short time, allowing you to damage it. It’s an interesting but ultimately fairly straightforward boss fight.
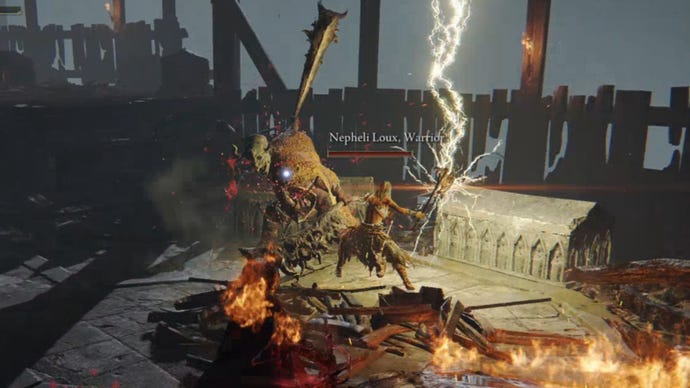
Omenkiller (Village Of The Albinaurics)
Omenkiller resides in the Village Of The Albinaurics, which can be found beneath the Moonlight Altar (the southwest mountain area of Liurnia). Shortly before meeting Omenkiller, you’ll likely come across Nepheli - the warrior who helped you defeat Godrick the Grafted back in Limgrave - and she will help you once again to defeat Omenkiller.
Not that Omenkiller is nearly as powerful as Godrick was. He has powerful club attacks and can breath fire at a moment’s notice, but when aggro’d on Nepheli, you are free to deal tonnes of damage to him safely.
Dragons x3 (Moonlight Altar)
Red Wolf (Moonlight Altar)
While not technically labelled as a boss, there is a Red Wolf akin to the upcoming Red Wolf Of Radagon on the western edge of the Moonlight Altar, just below a group of Crystalians. The Red Wolf is a startlingly powerful adversary thanks to his fast repositioning, his bite attacks, and his Glintstone sorceries.
Alecto, Black Knife Ringleader (Ringleader’s Evergaol)
Elden Ring Boss Guide - Alecto, Black Knife RingleaderWatch on YouTube
Elden Ring Boss Guide - Alecto, Black Knife Ringleader

Alecto, Black Knife Ringleader. She’s a tough one. It’s to be expected, given that her Ringleader’s Evergaol lies in the Moonlight Altar, which is a fairly late-game area - far more so than the rest of Liurnia. But it was still a surprise to me just how tough the leader of the Black Knife Assassins really is, with her numerous fast and very damaging attacks and her ability to dodge most ranged attacks you throw at her.
If you see her readying a grab, get out of the way quick, because that grab-and-backstab attack is practically a one-shot-kill - as is her large AoE explosion attack, which you’ll need to steer well clear from before punishing her during her recovery animation.
Royal Knight Loretta (Caria Manor)
Elden Ring Boss Guide - Royal Knight LorettaWatch on YouTube
Elden Ring Boss Guide - Royal Knight Loretta

Now we travel to the far north of Liurnia. Royal Knight Loretta is the guardian of the dangerous Caria Manor, and she is a dangerous adversary, make no mistake. She’s basically a sorceress variant of the Tree Sentinel found at the beginning of Limgrave, capable both of powerful melee attacks and endless Glintstone sorceries to bombard you from afar.
Check out our Elden RingRoyal Knight Loretta boss fightwalkthrough for more details.
Glintstone Dragon Adula (Caria Manor + Moonlight Altar)
Glintstone Dragon Adula is another named dragon which guards the Three Sisters - the area behind Caria Manor, which is home to three towers. Functionally, Adula is very similar to Glintstone Dragon Smarag. The only big difference here is that after losing a certain amount of health, Adula will fly away from Caria Manor for good. You can catch up with it again and slay it once and for all at the Moonlight Altar, just outside the Cathedral of Manus Celes.
Blaidd (Ranni’s Rise)
If you complete the entirety ofRanni’s quest, then when you come back to the foot of Ranni’s Rise, you’ll find Blaidd, Ranni’s ex-servant and your ex-ally, in a seemingly confused and hostile mindset. He will attack you on sight, proving a very similar combatant to the other Bloodhound Knight you’ve faced, but with the extra danger of a frostbite-inflicting sword capable of occasional AoE explosions of frost.
Red Wolf (Behind Caria Manor)
Alabaster Lord (Royal Grave Evergaol)
Don’t underestimate this opponent. Stay at range when it casts magic, and watch out for its attack where it runs around you before slicing at your back. If you’re a fan of guard counters, try to resist the urge when he uses this attack, as it will likely miss him.
Magma Wyrm Makar (Ruin-Strewn Precipice)
Elden Ring Boss Guide - Magma Wyrm MakarWatch on YouTube
Elden Ring Boss Guide - Magma Wyrm Makar

If you want to sidestep the Grand Lift of Dectus and reach the Altus Plateau, you’ll need to go through the Magma Wyrm Makar in the Ruin-Strewn Precipice. This dragon-like being spews magma on the ground around itself, which can make it difficult to get close at times. This fight is a test of patience, as the Wyrm loves to charge across its arena like a toddler having a tantrum.
Check out our Elden RingMagma Wyrm Makar boss fightwalkthrough for more details.
Great Horned Tragoth (Ruin-Strewn Precipice)
Great Horned Tragoth is another Volcano Manor contract, so you’ll only encounter him quite a bit later on in the game - and only then if you chose to spare Patches back in Murkwater Cave, and then progressedhis questlineto the point where he gives you a contract in Volcano Manor.
Tragoth makes for a fun opponent, with his crossbow in one hand and a massive hammer in the other, allowing him to switch up his playstyle at a moment’s notice.
Ravenmount Assassin (Academy)
Elden Ring Boss Guide - Ravenmount AssassinWatch on YouTube
Elden Ring Boss Guide - Ravenmount Assassin

The Ravenmount Assassin is a unique enemy in that you are called upon to help another ally, rather than calling upon an ally for aid yourself. Once you reach the main entrance of the Academy, head past the north-east seal and you’ll find a summon sign on the ground. Interact with it to aid Yura, Hunter of Bloody Fingers, in a fight against a being known as the Ravenmount Assassin.
The Ravenmount Assassin is like a more dangerous version of Bloody Finger Nerijus, from your first meeting with Yura. It is very quick with its bleed-inflicting blades, and can change targets as fast as thought, so don’t think you’re safe just because it’s currently focused on Yura. Take your time, and stay at range if you can.
Red Wolf Of Radagon (Academy)
Elden Ring Boss Guide - Red Wolf of RadagonWatch on YouTube
Elden Ring Boss Guide - Red Wolf of Radagon

The Red Wolf Of Radagon is one of the two essential Elden Ring bosses in Liurnia. It’s functionally identical to the Red Wolf behind Caria Manor, but you’ll likely encounter this one first in all honesty. Its various magical attacks are more difficult to avoid here thanks to the obstacles and confines of the room you’re in; but take your time, and time your attacks, and it will actually be over quite quickly thanks to the Wolf’s low health.
Check out ourElden Ring Red Wolf Of Radagon boss fight walkthroughfor more details.
Moongrum, Carian Knight (Academy)
Elden Ring Boss Guide - Moongrum Carian KnightWatch on YouTube
Elden Ring Boss Guide - Moongrum Carian Knight

The Carian Knight Moongrum guards the entrance to the Academy’s Grand Library where you’ll face Rennala. Moongrum is sort of like a Crucible Knight in miniature, with a large shield that can soak up plenty of attacks. He will occasionally switch out this shield for a staff in order to cast Glintstone sorceries to keep you on your toes.
Rennala, Queen Of The Full Moon (Academy)
Elden Ring Boss Guide - Rennala, Queen of the Full MoonWatch on YouTube
Elden Ring Boss Guide - Rennala, Queen of the Full Moon

Rennala, Queen Of The Full Moon, is the Great Rune holder of Liurnia, and the main boss of the entire region. Its first phase, while curious, its actually incredibly easy; its second phase, however, can be mightily annoying thanks to Rennala’s stunning array of powerful spell attacks and Spirit Ashes. You can find her in the heart of the Academy, in the Raya Lucaria Grand Library.
Check out ourElden Ring Rennala boss fight walkthroughfor more details.
Sorceress Sellen OR Witch-Hunter Jerren (Academy)
This boss fight is the culmination of Sorceress Sellen’s questline. Once you complete every step as described in ourElden Ring quests guidefor Sellen, you can return to the door of the Grand Library where Rennala resides. Outside the door are two summoning signs. One summons Sellen to aid in your fight against Witch-Hunter Jerren; the other summons Jerren to aid in your fight against Sellen.
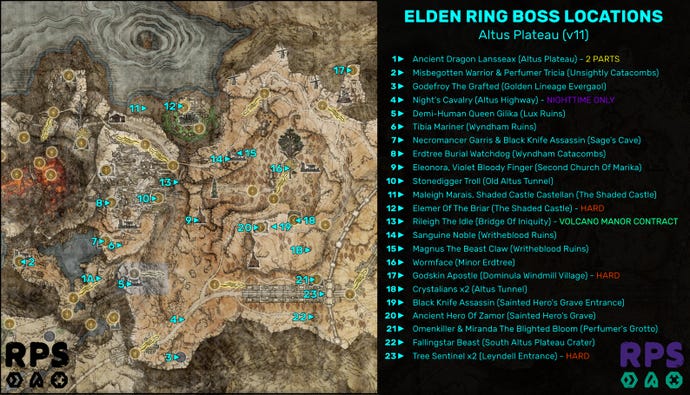
Elden Ring bosses: Altus Plateau
Use this map to find out the exact locations of every boss in the Altus Plateau. Be sure to view it atfull resolution!Image credit:Rock Paper Shotgun/Bandai Namco
Ancient Dragon Lansseax (Altus Plateau)
Ancient Dragon Lansseax, one of two sibling dragons with powerful lightning abilities, greets you shortly after you’ve battled through the Ruin-Strewn Precipice to reach the Altus Plateau for the first time. It certainly looks intimidating with its thunderous lightning attacks, but your gameplan here is much the same as with other dragons you’ve fought so far. Stay on horseback, slash at the legs, and play it safe.
Misbegotten Warrior & Perfumer Tricia (Unsightly Catacombs)
This unlikely duo is to be found at the very end of the Unsightly Catacombs tucked away in the western corner of the Altus Plateau. It’s always dangerous when you have to fight two bosses at once; fortunately, you can largely ignore Perfumer Tricia, who occupies a mainly supporting role, while you carefully battle the aggressive Misbegotten Warrior until the killing blow. After that, it should be plain sailing; as with all Perfumers, Tricia doesn’t put up much of a fight in one-on-one melee combat.
Godefroy The Grafted (Golden Lineage Evergaol)
Hidden within the easily missed Golden Lineage Evergaol is a familiar face: it’s Godrick’s near-identical descendant, Godefroy the Grafted. This is essentially another opportunity to fight Godrick with more levelled up stats and gear. This is obviously not a particularly easy fight, as Godrick/Godefroy has numerous lengthy combo attacks with unusual timings that may trip you up. But you can probably rely on your muscle memory from Stormveil Castle to make this fight quite a bit easier than the Godrick fight.
Night’s Cavalry (Altus Highway)
Another Night’s Cavalry can be found on the highway leading from the Grand Lift Of Dectus to the entrance to Leyndell along the south of the Altus Plateau. This Night’s Cavalry wields a flail, and is not afraid to leap large distances in order to hit you with it, so be wary.
Demi-Human Queen Gilika (Lux Ruins)
Tibia Mariner (Wyndham Ruins)
Another Tibia Mariner reveals itself as you approach the southern edge of the Wyndham Ruins. As with the Liurnian Mariner, this one is more powerful than the Limgrave variant, capable of summoning colossal skeletons for a short amount of time that sweep the land with their giant skeletal hands looking for you. But as with all Mariners, it’s a fairly easy fight once you know to ignore the summons and go straight for the boatman.
Necromancer Garris & Black Knife Assassin (Sage’s Cave)
The Sage’s Cave is home to two bosses in different arenas. The path splits towards the end of the dungeon, with Necromancer Garris on the left, and the Black Knife Assassin on the right.
Necromancer Garris is a fairly straightforward enemy: just dodge his summons and his homing skull attacks, and work on pummelling away at his low poise and low health. But the Black Knife Assassin is a dangerous one, because, for the most part, he’s completely invisible. You have to watch for the splashes he makes in the water to find him most of the time, and be very careful of his grab attack, which can backstab you for colossal (potential one-shot) damage.
Erdtree Burial Watchdog (Wyndham Catacombs)
Eleonora, Violet Bloody Finger (Second Church Of Marika)
Elden Ring Boss Guide - Eleonora, Violet Bloody FingerWatch on YouTube
Elden Ring Boss Guide - Eleonora, Violet Bloody Finger

The culmination of Yura’s minor invader questline (as described in ourElden Ring quests guide) which began way back with the fight against Bloody Finger Nerijus. Eleonora, Violet Bloody Finger is a powerful adversary with a powerful weapon that inflicts a lot of bleed damage in a short space of time. I’d recommend keeping your distance during her attacks, and hitting her either with ranged/magical attacks or carefully in melee while she recovers.
Stonedigger Troll (Old Altus Tunnel)
Maleigh Marais, Shaded Castle Castellan (The Shaded Castle)
Malais Marais is an invader-like miniboss who awaits you in the outskirts of the Shaded Castle. They’re a Perfumer, equipped with numerous AoE spray attacks which can inflict poison - or worse, Scarlet Rot - upon you. Stay out of the way of these, and watch out for their long-range rapier thrust attack, but otherwise adopt an aggressive playstyle to quickly whittle away their meagre health.
Elemer Of The Briar (The Shaded Castle)
Elden Ring Boss Guide - Elemer Of The BriarWatch on YouTube
Elden Ring Boss Guide - Elemer Of The Briar
Rileigh The Idle (Bridge Of Iniquity)
After slaying Old Knight Istvan for the Volcano Manor, you’ll be charged with hunting down Rileigh The Idle in the Altus Plateau. His summon sign can be found just a short distance south of the Bridge of Iniquity, in the ravine. Rileigh is a crossbowman who also wields a dagger for quick combo attacks. He has low health, but don’t underestimate his agility.
Sanguine Noble (Writheblood Ruins)
Magnus The Beast Claw (Writheblood Ruins)
Magnus The Beast Claw was newly added with patch 1.06 as part ofWhite Mask Varre’s questline. Instead of having to invade three players, you can now head to the Writheblood Ruins to invade Magnus’s world and defeat him to progress Varre’s quest. Magnus himself is a decent combatant, with a giant club and a series of ranged AOE attacks taken straight from Gurranq’s playbook. The shockwaves, rock-hurling, and heavy club attacks wear down your stamina very quickly if you block, so focus instead on dodging his attacks and countering in close range.
Wormface (Minor Erdtree)
A Wormface guards the minor Erdtree in the centre of the Altus Peninsula. This horrific-looking enemy is surprisingly fast, and loves to spew death-blight clouds everywhere around itself, making it difficult to finish this fight quickly. But the creature itself is not very powerful. I’d advise staying on horseback if you want to make it easier to avoid its multiple foot-stamps and death-blighting clouds.
Godskin Apostle (Dominula Windmill Village)
The Godskin Apostle awaits you at the very end of the Dominula Windmill Village (the strange area filled with dancing inhabitants). The Apostle is a surprisingly dangerous boss with quite a reach on its blade, particularly during its second phase where its body becomes strangely elongated. It also wields dangerous AoE black flame attacks which can easily kill you if you’re not prepared.
Crystalians x2 (Altus Tunnel)
Another pair of Crystalians awaits you at the end of the Altus Tunnel to the south of the Altus Plateau’s Minor Erdtree. They’re an annoying pair, with one staying at range and the other constantly jumping and thrusting with a spear, closing the distance between you. Bring a blunt weapon and take your time to avoid danger from both combatants.
Black Knife Assassin (Sainted Hero’s Grave Entrance)
There is a Black Knife Assassin guarding the entrance to the Sainted Hero’s Grave, just a short walk from the Rampartside Path Site of Grace. As with all Black Knife Assassins, it can be very dangerous if you run out of stamina, as he can easily perform a critical hit on you. But maintain your aggression and slash at him to disrupt his attacks, and you’ll make the fight much easier.
Ancient Hero Of Zamor (Sainted Hero’s Grave)
Inside the Sainted Hero’s Grave, you’ll find another Ancient Hero Of Zamor awaiting you at the end. The Altus Plateau does seem to be the region where bosses are recycled and upscaled, giving you a chance to test yourself against a more powerful version of what you’ve faced before. But as long as you watch out for its quick movements and frost attacks, you should be alright here, as it doesn’t have very much health.
Omenkiller & Miranda The Blighted Bloom (Perfumer’s Grotto)
Fallingstar Beast (South Altus Plateau Crater)
Head just a little way south of the entrance to Leyndell, the Capital, and you’ll come across a crater. As you approach the crater, a Fallingstar Beast will be summoned. This is a dangerous foe at any stage of the game thanks to its hard-to-avoid charge attacks and large gravity-based AoE spells. You can fight it on foot or on horseback, but either way be careful of its charges, stay on the move, and don’t get greedy. My best advice: aim for the face.
Tree Sentinel x2 (Leyndell Entrance)
Now, this one’s pretty dangerous. There are two Tree Sentinels guarding the entrance to the Capital, Leyndell. Each of these Tree Sentinels is quite a lot stronger and more threatening than the one that you faced in Limgrave. You’ll definitely want to stay on horseback for this fight, and be careful not to overextend yourself while fighting one Sentinel, lest the other come up behind you and stab you in the back.
Elden Ring bosses: Caelid Wilds
Use this map to find out the exact locations of every boss in the Caelid Wilds. Be sure to view it atfull resolution!Image credit:Rock Paper Shotgun/Bandai Namco

Magma Wyrm (Gael Tunnel)
The Magma Wyrm is likely to be one of the first bosses you’ll encounter in the Caelid Wilds, located as it is in the Gael Tunnel between Limgrave and Caelid. Much like Magma Wyrm Makar on the border between Liurnia and Altus, this Magma Wyrm loves to spew magma and charge across its arena, meaning players should play this one patiently if they want a clean victory.
Erdtree Avatar (West Minor Erdtree)
The two Avatars of Caelid are the strongest Erdtree Avatars you’ll have experienced so far in this list. The lesser of them can be found to the west, a short way in from Limgrave on the north shore. It packs more of a punch than the others so far, but otherwise it’s much the same fight.
Ertree Burial Watchdog x2 (Minor Erdtree Catacombs)
There’s a reason the Erdtree Burial Watchdog was one of the first and easiest bosses in Limgrave: it’s slow, and has clearly telegraphed and easily learned attack patterns. FromSoftware’s way of upping the difficulty later on is to throw two of them at you simultaneously in the Minor Erdtree Catacombs. You’ll have to play this one quite carefully, and keep an eye on both to make sure you aren’t punished for your attacks.
Mad Pumpkin Head x2 (Caelem Ruins Underground)
Knights Of The Great Jar x3 (Caelid Colosseum)
Sadly, you don’t get to fight the gigantic Great Jar which sits, arms crossed, before the Caelid Colosseum. Instead, you have three summon signs which allow you to call forth three Knights Of The Great Jar to fight one at a time. Defeat all of them in a row, and you get a reward. These fighters each have different equipment and a different playstyle, so you should play it careful at first to figure out the attack patterns of each one.
Frenzied Duelist (Gaol Cave)
The Frenzied Duelist is a not much different from the Grave Warden Duelists you’ve encountered previously. It just hits a bit harder. The tough part is getting to him: you have to pull the lever at the end of the cave to unlock all the jail cells, then find the large cell with the wooden plank on the right-hand side. Cut through the plank to reach the Frenzied Duelist.
Decaying Ekzykes (Caelid Highway South)
Decaying Ekzykes is a Scarlet Rot-breathing dragon found on the south of the long circular road around the Aeonia Swamp. He’s more dangerous than the other dragons you’ve already come across, mainly because he has an extra attack where he breathes powerful Scarlet Rot gas around him, making it imperative that you keep your distance at these moments.
Cemetary Shade (Caelid Catacombs)
Another Cemetary Shade can be encountered at the end of the Caelid Catacombs to the south of the Caelid Wilds. Like other Cemetary Shades you’ll find across the Lands Between, this one is hard to pin down and can be devastating if you allow its quick knife attack combos to land; but it has amazingly little health, and can be defeated in just a few strong hits.
Night’s Cavalry (Caelid Highway South)
This flail-wielding Night’s Cavalry can be found a short distance along the road past Decaying Ekzykes, and like other Night’s Cavalry it will only spawn at night. It’s much the same fight as any other Night’s Cavalry. If you can focus his horse and get him on the ground, you can get a nice critical attack for a large chunk of damage.
Death Rite Bird (Southern Aeonia Swamp Bank)
Another powerful Death Rite Bird can be found between Aeonia Swamp and Redmane Castle, and, like the one in Liurnia, it only appears at nighttime. This one is even stronger than the Liurnia variant, so be extra careful to avoid its devastating black flame attacks.
Commander O’Neil (Aeonia Swamp)
Commander O’Neil resides deep in the forbidding Aeonia Swamp. This boss relies heavily on some annoying archer summons to harass you while you fight him, so it’s a good idea to clear these summons out as soon as they arrive. Commander O’Neil himself is certainly more dangerous than the average fighter, but one-on-one he’s very beatable.
Millicent (Aeonia Swamp)
Before you complete Gowry’s quest to cure Millicent’s sickness (as described in ourElden Ring quests guide), she may invade you as you explore the Aeonia Swamp. She can be fairly dangerous if you’re on the receiving end of one of her flurry attacks, but otherwise the real danger is the Swamp itself. Make sure you’re equipped with something that can handle Scarlet Rot, or stay on dry land as much as possible.
Nox Swordstress & Nox Priest (Chair-Crypt Of Sellia)
It’s always a little worrying when you have to fight two bosses at once, but the Nox Swordstress and Nox Priest really aren’t too bad. Their attacks may be strong, but both enemies have very low health, and can be quickly burst down without too much trouble - especially if you have summons to aid you.
Fallingstar Beast (Sellia Crystal Tunnel)
Ah yes, the Sellia Crystal Tunnel. This place may be many players' first glimpse of the Caelid Wilds, after being ensnared in a transporter trap in a chest back in Limgrave that transports you here. Fight your way to the end and you’ll come across another Fallingstar Beast just like the one in the crater in the Altus Plateau. As with before: aim for the face.
Cleanrot Knight x2 (Abandoned Cave)
Battlemage Hugues (Sellia Evergaol)
Battlemage Hugues is a potent spellcaster who fights you inside the Sellia Evergaol in the centre of the Caelid Wilds. Of particular note are his magical hammer attacks, which produce an AoE shockwave which is hard to avoid in melee range; and his magical comet attacks, which are difficult to avoid for the same reason. So stay on the move against this sorcerer, and use strong melee attacks to interrupt his spells.
Elder Dragon Greyoll (Outside Fort Faroth)
Crystalians x3 (Sellia Hideaway)
Godskin Apostle (Divine Tower of Caelid)
A powerful Godskin Apostle can be found at the base of the Divine Tower of Caelid’s interior. It is identical to the one you fight at the Dominula Windmill Village in the Altus Plateau - which is to say, it’s frighteningly powerful. However, it is susceptible to bleed attacks, which makes the fight easier that it could have been.
Bell Bearing Hunter (Isolated Merchant’s Shack)
Just as the Bell Bearing Hunter appears at night instead of Bernahl back in Limgrave’s Warmaster’s Shack, so too does he appear at night instead of the merchant at Caelid’s Isolated Merchant’s Shack. He’s as tough here as he ever was, so take extra care against him. Either get up close and personal (and be good at dodging) or stay at long range. Don’t stay at mid-range, or his telekinetic sword attacks will eviscerate you.
Putrid Avatar (East Minor Erdtree)
Beastman Of Farum Azula x2 (Dragonbarrow Cave)
I’ve heard lots of people have a hard time against the two Beastmen of Farum Azula at the end of Dragonbarrow Cave. It’s true that if you let them do their thing, they can be very deadly: one stays at range and bombards you with throwing knives, while the other closes the distance with their powerful melee attacks.
To make this fight easier, you should summon some powerful Spirit Ashes to distract the melee Beastman while you quickly fight and kill the ranged Beastman. Alone, these guys are pushovers.
Night’s Cavalry (Lenne’s Rise Bridge)
Flying Dragon Greyll (Farum Greatbridge)
Black Blade Kindred (Bestial Sanctum)
The Black Blade Kindred guards the main entrance to the Bestial Sanctum on the northeast tip of the Caelid Wilds. This powerful gargoyle switches between two weapons and sets of attacks at will, and so you’ll need to spend a fair bit of time learning all its attack patterns before you can cleanly take him out.
Gurranq (Bestial Sanctum)
After feeding Gurranq four Deathroots, he will become hostile towards you the next time you visit him. He is an incredibly powerful and aggressive enemy, filled with long attacks that are hard to block or dodge. Fortunately, you need only take a tiny chunk off his health bar before he is pacified once more, so this isn’t a true boss fight (though I thought it worth mentioning regardless).
Misbegotten Warrior & Crucible Knight (Redmane Castle)
Starscourge Radahn (Redmane Castle)
Elden Ring Boss Guide - Starscourge RadahnWatch on YouTube
Elden Ring Boss Guide - Starscourge Radahn

Starscourge Radahn is the main boss of the Caelid Wilds, and the bearer of another Great Rune. He is probably the runebearer of the major five which gave me the most trouble, with his powerful sweeping strikes and devastating ranged attacks. Even with the full might of everyone at the festival joining you, it can be quite a task to take him down.
Check out ourElden Ring Radahn boss fight walkthroughfor more details.
Elden Ring bosses: Mt. Gelmir
Use this map to find out the exact locations of every boss in Mt. Gelmir and Volcano Manor. Be sure to view it atfull resolution!Image credit:Rock Paper Shotgun/Bandai Namco

Anastasia, Tarnished-Eater (Corpse-Stench Shack)
Your second encounter with Anastasia takes place at the Corpse-Stench Shack on the path towards Mount Gelmir from the Altus Plateau. It’s much the same as before, with her overhead attacks and slam combos, but obviously here she deals rather more damage and takes more punishment than she did back in Limgrave.
Grafted Scion (North Mt. Gelmir)
Guarding the journey towards Volcano Manor are a number of hostile creatures, not least of which is the Grafted Scion you’ll encounter across on the edge of the cliffs in the ruined campsite. Its erratic moveset is identical to previous versions of this boss, so there shouldn’t be too much to worry about here.
Demi-Human Queen Margot (Volcano Cave)
Ulcerated Tree Spirit (Minor Erdtree)
Kindred Of Rot x2 (Seethewater Cave)
The Kindred Of Rot are another very easy boss fight compared to most you’ll find in this region. They can be dangerous if you don’t dodge their sprays of projectile attacks, but once you get up close and personal, you’ll find they have the health of a regular enemy, and can be very quickly killed.
Red Wolf Of The Champion (Gelmir Hero’s Grave)
The Red Wolf of the Champion can be found at the very end of Gelmir Hero’s Grave, and - thankfully - I actually don’t think this boss is nearly as challenging as the trek it takes to reach it. This Red Wolf is much the same as those you’ve already faced in Liurnia, albeit a little more powerful and healthy. It still should go down quickly compared to other Elden Ring bosses in the region.
Full-Grown Fallingstar Beast (Ninth Mt. Gelmir Campsite)
Elden Ring Boss Guide - Full-Grown Fallingstar BeastWatch on YouTube
Elden Ring Boss Guide - Full-Grown Fallingstar Beast

Check out our Elden RingFull-Grown Fallingstar Beast boss fightwalkthrough for more details.
Wormface (Road Of Iniquity)
In sight from the Road Of Iniquity Site of Grace is a small encampment with a single regular enemy. Cut down this enemy, and - rather unexpectedly - a Wormface will take its place. If you’ve been to the Minor Erdtree in the Altus Plateau, you already know what to expect from this horrible-looking creature. Stay well clear of its death blight attacks, and hack away at its legs when you’re able. This fight is much easier on horseback.
Fire Prelate (Fort Laiedd)
The only noteworthy enemy guarding the interior of Fort Laiedd on the west coast of Mt. Gelmir is a Fire Prelate. This enemy can certainly be dangerous to the unprepared, constantly spewing flames that make it difficult for melee characters to get close. Up your fire resistance and use frost damage to shorten this fight.
Magma Wyrm (South Of Fort Laiedd)
A Magma Wyrm can be found a short distance south of Fort Laiedd. It will emerge from the magma lake as you approach, and - as with all Magma Wyrms - start to charge about the place in short order, leaving trails of magma in its wake. It packs a real punch here, so play it patiently.
Demi-Human Queen Maggie (Hermit Village)
Abductor Virgin x2 (Volcano Manor)
Inquisitor Ghiza (Volcano Manor Upper Floor)
Inquisitor Ghiza invades your world as you enter the large dining area on the upper floor of Volcano Manor. Take the stairs next to Lady Tanith to reach it. Ghiza himself wields a unique wheel weapon known as Ghiza’s Wheel, which you can obtain after defeating him. He hits hard and inflicts bleed, so be careful when you decide to attack; but like most invaders, he can be very easily interrupted.
Magma Wyrm (Volcano Manor)
For those wondering how to find the Legacy Dungeon part of Volcano Manor, head down the hall from Lady Tanith, take the first door on your right, and slash at the back wall. Explore the dungeon enough and you’ll come across a lift that takes you down to another Magma Wyrm fight.
This Wyrm fight is a little harder because your confines are more cramped and magma’d up to begin with, giving you less space to get out of the way of its charge attacks. But otherwise, it’s much the same fight as before.
Godskin Noble (Volcano Manor)
Oh, good. Another Godskin fight. This ones are always tough. This Godskin Noble can be found in the Temple of Eiglay, and it’s near-identical to the Noble you encountered on the bridge to the Divine Tower of Liurnia. It’s deceptively quick, with some extremely powerful combo attacks with its rapier that can lead to a quick death. Use bleed attacks and Spirit Ashes.
Rykard, Lord of Blasphemy (Volcano Manor)
Elden Ring Boss Guide - God-Devouring Serpent & Rykard, Lord Of BlasphemyWatch on YouTube
Elden Ring Boss Guide - God-Devouring Serpent & Rykard, Lord Of Blasphemy
The major boss fight of Mt. Gelmir, there are two ways of reaching Lord Rykard beneath Volcano Manor. Hayden explains both very well in hisElden Ring walkthrough.
The first stage of this fight is against the God-Devouring Serpent, which, although terrifying, is not as bad as the crazy second phase against Rykard himself. Expect to dodge an awful lot of attacks against him in this fight of attrition. Fortunately you have the perfect weapon to defeat this boss handed to you on your way. Make sure you use its skill to take large chunks of health off the boss with every opening it gives you.
Check out ourElden Ring Rykard boss fight walkthroughfor more details.
Tanith’s Knight (Volcano Manor)
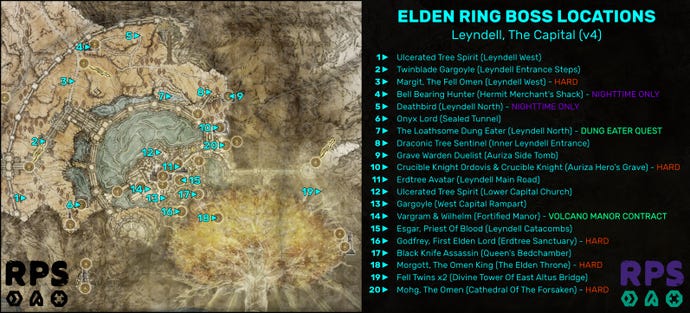
Elden Ring bosses: Leyndell, The Capital
Use this map to find out the exact locations of every boss in Leyndell. Be sure to view it atfull resolution!Image credit:Rock Paper Shotgun/Bandai Namco
Ulcerated Tree Spirit (Leyndell West)
Twinblade Gargoyle (Leyndell Entrance Steps)
Margit, The Fell Omen (Leyndell West)
Well, well, well! Margit is back, and is aching for a rematch after you bested him at the entrance to Stormveil Castle oh so many hours ago. He has exactly the same moves and patterns as before, but he obviously hits a lot harder and has more health than before, making this a much more challenging phase two of an already dangerous fight.
Bell Bearing Hunter (Hermit Merchant’s Shack)
Another nasty nighttime encounter with the Bell Bearing Hunter awaits you at the Hermit Merchant’s Shack on the outskirts of Leyndell. This is probably the hardest Bell Bearing Hunter fight in the game, simply because the difficulty scaling of Lenydell dials the damage and health of this boss up to 11. Otherwise, it’s the same as all the other Bell Bearing Hunter fights.
Deathbird (Leyndell North)
Anyone else getting a little tired of Deathbirds? No? Well then, get yourself over to the far north of Leyndell’s outskirts, just east of the Hermit Merchant’s Shack. If you go there at night, a familiar fight with a Deathbird will be waiting for you.
Onyx Lord (Sealed Tunnel)
An Onyx Lord can be found at the end of Leyndell’s Sealed Tunnel, guarding the entrance to the Divine Tower of West Altus. The Onyx Lord is very, very similar to the Albaster Lord from earlier - it’s just a little tankier and harder-hitting. All the same gravity-based attacks and easily avoidable meteor strike spells from before.
The Loathsome Dung Eater (Leyndell North)
Progress along the questline of the Loathsome Dung Eater, and you’ll eventually free him from his jail beneath Leyndell, where he’ll promptly challenge you to a fight. This is where you must go to fight him. The main worry here isn’t the Dung Eater himself; it’s the fact that a giant crab also stalks these waters, so you’d best either distance yourself from it or finish it off quickly before facing the Dung Eater - who isn’t much different from any other invader you’ve faced so far.
If you want more information on this whole questline, be sure to check out ourElden Ring Dung Eater quest walkthrough.
Draconic Tree Sentinel (Inner Leyndell Entrance)
In order to breach the inner walls of Leyndell and enter the Capital City itself, you’ll need to head to the north of the wall, and face the Draconic Tree Sentinel guarding the entrance at the far side of the region. If you faced the Tree Sentinel in Limgrave, it’s very similar, but obviously hits much, much harder than the Limgrave variant ever did. The only other major difference is that the horse can belch flames at a moment’s notice, so watch out for whenever the horse rears up for this attack.
Check out our Elden RingDraconic Tree Sentinel boss fightwalkthrough for more details.
Grave Warden Duelist (Auriza Side Tomb)
It’s a bit odd, finding a boss as underwhelming as the Grave Warden Duelist in the Capital, of all places. It shouldn’t take you long to reach the final section of the Auriza Side Tomb, and when you do you’ll find this familiar fight waiting for you. As with before, the key is either weathering or dodging his attacks, and not attacking him yourself until he’s properly in recovery mode.
Crucible Knight Ordovis & Crucible Knight (Auriza Hero’s Grave)
This fight is going to upset some people. Crucible Knights are among the most challenging humanoid bosses you’ll encounter at every stage of Elden Ring, and here you’re forced to fight two at once.
Ordovis is pretty much a regular sword-and-shield Crucible Knight, but with a spinning holy attack that you should keep your distance from. The other Crucible Knight is a spear-user, so watch out for its long-ranged holy attacks. Use the most powerful Spirit Ashes at your disposal to distract one while you engage the other; then, when your Spirit Ashes are dead, take your time and only strike at one when both are recovering from attacks. It’s a tough fight, but you can do it with a bit of patience.
Erdtree Avatar (Leyndell Main Road)
As you walk down the largest road in Leyndell, an Erdtree Avatar will spawn partway along the road. There’s not much to say here that hasn’t been said earlier. It’s a very normal Erdtree Avatar, so just dodge its big attacks and spells, and hack away at it until it is no more.
Ulcerated Tree Spirit (Lower Capital Church)
Gargoyle (West Capital Rampart)
Another Gargoyle can be found and fought on the West Capital Rampart, very near the Site of Grace of the same name. The area here is slightly constricting, so you should be careful of your surroundings as you dodge to avoid its attacks.
Vargram & Wilhelm (Fortified Manor)
If you speak enough to Knight Bernahl at the Volcano Manor while you’re off completing contracts for Lady Tanith, then he’ll give you a contract of his own: to aid him in invading the world of Vargram the Raging Wolf, and Errant Sorcerer Wilhelm. This 2v2 fight is an interesting one, although it’s not terribly difficult. You can safely leavae Bernahl to fight Vargram for a while as you take on Wilhelm, who doesn’t stand much of a chance against you at close range.
Esgar, Priest Of Blood (Leyndell Catacombs)
Godfrey, First Elden Lord (Erdtree Sanctuary)
Elden Ring Boss Guide - Godfrey, First Elden LordWatch on YouTube
Elden Ring Boss Guide - Godfrey, First Elden Lord

Black Knife Assassin (Queen’s Bedchamber)
Make your way to the Queen’s Bedchamber just past Godfrey, and you’ll encounter a little interlude before the big fight: a fairly ordinary Black Knife Assassin. Obviously, you should still be careful here. Black Knife Assassins are always dangerous if you let them expend your stamina and backstab you.
Morgott, The Omen King (The Elden Throne)
Elden Ring Boss Guide - Morgott, the Omen KingWatch on YouTube
Elden Ring Boss Guide - Morgott, the Omen King

Morgott, The Omen King is essentially a more powerful version of Margit, The Fell Omen. He’s stronger and faster, and mixes up familiar attack patterns with more challenging and unusual timing attacks to try and catch you off-guard. Once you stun him at roughly half-health, back off quickly to avoid his raging flame attack. I found that bringing the Glintblade Phalanx Ashes Of War or anything else that deals high posture damage is a great way to make the fight easier.
Check out ourElden Ring Morgott boss fight walkthroughfor more details.
Fell Twins x2 (Divine Tower Of East Altus Bridge)
As you make your way along the bridge to the Divine Tower of East Altus, your screen will go dark, and you’ll be faced with an unusual arena-less boss fight against two Fell Twins. One Twin is much more aggressive, but that’s a good thing, because it distances him from the other, allowing you to defeat them one at a time. But if you need further help separating them, Spirit Ashes should help buy you some time. On their own, the Twins hit hard but can be easily dealt with thanks to clearly telegraphed attacks.
Mohg, The Omen (Cathedral Of The Forsaken)
Mohg, The Omen is a powerful boss who you’ll find at the very end of the Subterranean Shunning-Grounds, the vast underground network that rests beneath Leyndell. Mohg himself is a lesser version of the secret Runebearer Mohg, Lord Of Blood, who you’ll find at Mohgwyn Palace.
Mohg, The Omen wields a giant trident and calls down sprays of bleed-inflicting fire which makes this a hard fight for melee Spirit Ashes to help you out with. Mohg hits hard and fast, and has a startling range. Be sure to pick up Mohg’s Shackle from earlier in the dungeon, and use it to lock him down twice during his first phase.
Elden Ring bosses: Underground Layer
Use this map to find out the exact locations of every boss in the underground regions. Be sure to view it atfull resolution!Image credit:Rock Paper Shotgun/Bandai Namco

Dragonkin Soldier Of Nokstella (Nokstella)
The first major boss you’ll find in Ainsel River is certainly a big one. The Dragonkin Soldier of Nokstella is one of several Dragonkin Soldiers you’ll come across in the underground layer of Elden Ring’s map, and acts rather like a slightly smaller dragon which prefers claw and slam attacks to breathing fire. It’s a powerful boss who can likely kill you with just a couple of hits, so stay under its legs or at range to keep yourself as safe as possible.
Baleful Shadow (Nokstella)
The Baleful Shadow can be fought as part ofRanni’s questline. Essentially an evil version of Blaidd, the Baleful Shadow is one of the most powerful humanoid enemies you’re likely to have come across so far, capable of dangerous combos with its massive two-handed greatsword.
Dragonkin Soldier (Lake Of Rot)
Putrid Tree Spirit (Grand Cloister)
Drop down to the ground from the Grand Cloister Site of Grace, and then head the opposite direction from where you find the coffin that takes you to Astel. As you approach the Rot waterfall at the end of this path, a Putrid Tree Spirit will spawn and attack you.
Astel, Naturalborn Of The Void (Beyond Lake Of Rot)
Elden Ring Boss Guide - Astel, Naturalborn Of The VoidWatch on YouTube
Elden Ring Boss Guide - Astel, Naturalborn Of The Void

Check out our Elden RingAstel, Naturalborn of the Void boss fightwalkthrough for more details.
Minor Erdtree (Deeproot Depths)
Crucible Knight Siluria (Deeproot Depths)
Crucible Knight Siluria is the other named Crucible Knight besides Ordovis. She isn’t nearly as difficult to defeat, however, because unlike the cowardly Ordovis, Siluria fights you one-on-one. It’s still a tough fight, as she packs all the regular long combos of the Crucible Knight’s repertoire, and has a surprisingly good reach with her polearm.
Fia’s Champions (Deeproot Depths)
Fia’s Champions await you in this secret area of the Deeproot Depths, and only become available to fight once you’ve progressed through Fia’s questline to the point where she leaves the Roundtable Hold (as described in ourElden Ring quests guide). These champions are individually not very powerful, but together they can easily wear you down. The final phase is the hardest, as you must fight three invaders simultaneously, one of whom is the tanky and surprisingly nimble Lionel The Lionhearted.
Lichdragon Fortissax (Deathbed Dream)
After fighting Fia’s Champions, if you choose to hug Fia then later on when you return you’ll find her asleep where you left her. Interact with her to enter the Deathbed Dream, where you’ll fight Lansseax’s sibling, the Lichdragon Fortissax. It’s a near-identical fight, but this time you can’t use Torrent. It can be rather tough to avoid Fortissax’s lightning attacks in melee range, but fortunately this dragon doesn’t have much of an answer to the patient ranged playstyle.
Mimic Tear (Siofra River)
Ancestor Spirit (Siofra River)
Regal Ancestor Spirit (Siofra River)
Elden Ring Boss Guide - Regal Ancestor SpiritWatch on YouTube
Elden Ring Boss Guide - Regal Ancestor Spirit

Check out our Elden RingRegal Ancestor Spirit boss fightwalkthrough for more details.
Dragonkin Soldier (Siofra River)
Oh look, it’s another Dragonkin Soldier! This one can be found at the base of the giant waterfall next to the northern Hallowhorn Grounds. Like the others, it’s big and strong and its whole gameplan revolves around swiping and clawing at you, so you should spend some time learning its tells so you know when to dodge-roll out of the way.
Valiant Gargoyles (Siofra Aqueduct)
Elden Ring Boss Guide - Valiant Gargoyle & Valiant Gargoyle (Twinblade)Watch on YouTube
Elden Ring Boss Guide - Valiant Gargoyle & Valiant Gargoyle (Twinblade)

Unless you’re min-maxing or seriously overlevelled, it can be a real challenge to fight both of them at once. You’ll have to be very careful here.
Check out our Elden RingValiant Gargoyles boss fightwalkthrough for more details.
Nameless White Mask (Mohgwyn Palace)
White-Faced Varre (Mohgwyn Palace)
White-Faced Varre is the firstNPC characteryou encounter in Elden Ring, standing next to the First Step Site of Grace in Limgrave. Progress his surprisingly insidious questline to its culmination, and you’ll be brought to Mohgwyn Palace, where you can summon and fight Varre himself next to the Dynasty Mausoleum Midpoint Site of Grace.
Varre is not a terribly challenging opponent. He wields a strange blunt-damage-inflicting bouquet of flowers, with a short range that you can easily back away from. Watch out for his quickfire flame attacks and you should find this fight surprisingly straightforward considering your late-game surroundings.
Mohg, Lord Of Blood (Mohgwyn Palace)
Mohg, Lord Of Blood is one of the most dangerous enemies you’ll ever encounter in Elden Ring. This secret runebearer resides within Mohgwyn Palace, and is a stronger version of Mohg The Omen, who you can fight in the Subterranean Shunning Grounds beneath Leyndell.
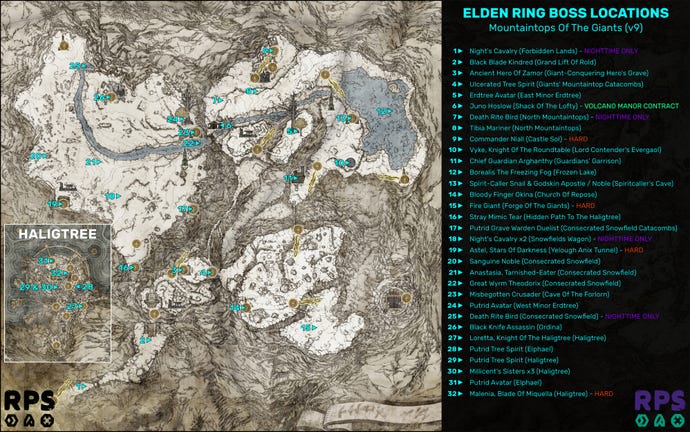
Elden Ring bosses: Mountaintops Of The Giants
Use this map to find out the exact locations of every boss in the Mountaintops Of The Giants. Be sure to view it atfull resolution!Image credit:Rock Paper Shotgun/Bandai Namco
Night’s Cavalry (Forbidden Lands)
A very short way into the Forbidden Lands at night will take you into the path of yet another Night’s Cavalry. Like the one in the Caelid Wilds, this one is a particularly troublesome variant, with a long halberd that boasts a surprising reach.
Black Blade Kindred (Grand Lift Of Rold)
A Black Blade Kindred guards the entrance to the Grand Lift Of Rold. This giant gargoyle is identical to the Kindred that you may have encountered outside Gurranq’s Bestial Sanctum in Caelid, and its attacks are much the same as any Gargoyle, so you should know what you’re getting into here. It hits hard, but an understanding of when to dodge to avoid its attacks makes it fairly straightforward.
Ancient Hero Of Zamor (Giant-Conquering Hero’s Grave)
An Ancient Hero Of Zamor can be found stalking the final room of the Giant-Conquering Hero’s Grave. With the difficulty scaling of this late-game region in play, this Ancient Hero hits very hard, and shouldn’t be underestimated.
Ulcerated Tree Spirit (Giants' Mountaintop Catacombs)
Everyone’s favourite recurring boss, the Ulcerated Tree Spirit, can be found at the end of the Giants' Mountaintop Catacombs. Like the one early on in the Fringefolk Hero’s Grave in Limgrave, one of the main difficulties here is understanding the Spirit’s movements and attacks in a confined space. But take your time and dodge frequently, and the fight shouldn’t take too long.
Erdtree Avatar (East Minor Erdtree)
Juno Hoslow (Shack Of The Lofty)
Juno Hoslow, Knight of Blood is the final of the three Volcano Manor contract killings that are assigned to you before you are invited to face Lord Rykard. Juno can be found just outside the Shack Of The Lofty, and he uses dual whips that can activate very quickly and make it quite hard for you to stay within his melee range.
However, at the risk of sounding like a broken record, all humanoid, human-sized NPCs in Elden Ring can be interrupted quite easily with heavy attacks, so use this to your advantage to get up close and personal, and deal a load of damage before retreating out of range.
Death Rite Bird (North Mountaintops)
Another Death Rite Bird can be found just past the bridge connecting the Stargazer Ruins area of land to the Castle Sol area of land. Like the one you encountered in the Caelid Wilds, this Death Rite Bird is most dangerous when it tries to catch you in its large AoE black flame attacks. I’d advise tackling it from atop Torrent.
Tibia Mariner (North Mountaintops)
If you passed the aforementioned bridge, you probably noticed several gigantic skeletons emerging from the ground to swipe at you. The source of this necromancy is a squirrelled-away Tibia Mariner who can be found on a little ledge just off the edge of the graveyard. Like all Tibia Mariners, it’s very weak once you actually manage to reach it, relying instead on the power of its summons. The good news here is that those giant skeletons can’t even reach you when you’re on the Tibia Mariner’s ledge, so you can kill it with ease once you’ve found it.
Commander Niall (Castle Sol)
Elden Ring Boss Guide - Commander NiallWatch on YouTube
Elden Ring Boss Guide - Commander Niall
Okay, fuck this guy. Commander Niall is genuinely the boss that I had the most difficulty beating in the entire game - including the final boss fights. Located at the end of the dangerous Castle Sol, Commander Niall’s first step is always to summon two powerful Banished Knights to chase you down and kill you. Once you’ve sorted these two punishing adversaries out (use heavy attacks to interrupt them!), Niall himself starts properly fighting with an array of very powerful whirlwind and lightning attacks which force you to really take your time with him.
Check out our Elden RingCommander Niall boss fightwalkthrough for more details.
Vyke, Knight Of The Roundtable (Lord Contender’s Evergaol)
Don’t let Vyke’s small stature fool you: he’s one of the more powerful Evergaol inhabitants in the game. He didn’t give me quite as much trouble as Alecto did, but he’s a nasty enemy with a long spear that can call down very powerful lightning attacks at short notice. Watch out for his leap attack: he hangs in the air just a touch longer than you’d expect, encouraging you to mistime your dodge.
Chief Guardian Arghanthy (Guardians' Garrison)
Borealis The Freezing Fog (Frozen Lake)
Borealis The Freezing Fog is one of the more powerful dragons in Elden Ring - as you’d expect from one which hides in the far corner of the world map. At the beginning of the fight there’s so much fog that you can barely see the dragon; fortunately this fog soon dissipates, and you can get on with fighting Borealis like you would any other dragon, staying under its legs as much as possible and taking care to avoid its sweep attacks.
Spirit-Caller Snail & Godskin Apostle / Noble (Spiritcaller’s Cave)
The exception is the final boss fight of the cave, which tasks you with defeating first a Godskin Apostle and then a Godskin Noble before the perpetrator, the Spirit-Caller Snail, finally reveals itself for an easy victory. Of course, you shouldn’t underestimate the challenge of facing the Godskins back-to-back like this, as they’re both very challenging foes.
Bloody Finger Okina (Church Of Repose)
Fire Giant (Forge Of The Giants)
The gigantic Fire Giant is the largest boss in the game, and comes equipped with a number of huge AoE attacks, mostly relating in some way to the shield which he loves to slam down into the ground. You should fight the Fire Giant as though it were a dragon, staying under its legs and looking to close distance and keep up the pressure as much as possible.
Once you reach the Fire Giant’s second phase, it will begin to conjure fiery orbs which you should try to steer well clear of, lest they explode and incinerate you. No matter how much health you have, any of the Fire Giant’s attacks will likely kill you in two hits, so this is definitely a fight to play patiently.
Check out ourElden Ring Fire Giant boss fight walkthroughfor more details.
Stray Mimic Tear (Hidden Path to The Haligtree)
Putrid Grave Warden Duelist (Consecrated Snowfield Catacombs)
Funny how putting the word “Putrid” ahead of a name instantly makes its owner that much more terrifying. The Putrid Grave Warden Duelist which you’ll find at the end of the Consecrated Snowfield Catacombs inflicts Scarlet Rot with its attacks, so you should look to increase your immunity stat as much as possible if you’re having trouble with this fight, and use a spell which clears Rot buildup whenever necessary. Otherwise, it’s much the same as the other Grave Warden Duelists you’ve already fought.
Note: if you’re wondering how to get to the whole western region of the Mountaintops of the Giants, check out Hayden’s guide onhow to find Malenia in Elden Ring, because it covers exactly this topic.
Night’s Cavalry x2 (Snowfields Wagon)
Astel, Stars Of Darkness (Yelough Anix Tunnel)
Astel, Stars Of Darkness is an even more powerful version of the already dangerous Astel, Naturalborn of the Void that you can find at the end of the Lake Of Rot beneath Liurnia. Like the first, this Astel loves to use very powerful and multi-phase AoE attacks, but you have to try to stick close to it regardless. An i-frame skill such as Bloodhound’s Step is invaluable for avoiding damage here.
Watch out for Astel’s one-shot move, where it disappears, then reappears as several Astels above you, all reaching out to grab you. If you’re caught, you’re dead, plain and simple. I didn’t take any chances here, firing off Bloodhound’s Step whenever I saw this attack approaching. I suggest you do the same or something similar.
Sanguine Noble (Consecrated Snowfield)
Remember the Sanguine Noble from the Writheblood Ruins in the Altus Plateau? Well, here he is again, but this time he’s an invader who attack you as you pass just beyond the Runebear and into the ruins on the far west side of the Mountaintops region. As before, the main issue here is the Noble’s proclivity for bleed attacks, and creating pools of blood on the ground which you’ll need to sidestep before getting close to him.
Anastasia, Tarnished-Eater (Consecrated Snowfield)
Your final meeting with the lovely Anastasia takes place on the edge of the river running through the Consecrated Snowfield. She is of course the most powerful she’s ever been here, but otherwise she is identical to her previous encounters, with all the same simple but powerful attack patterns.
Great Wyrm Theodorix (Consecrated Snowfield)
The greatest of all the Magma Wyrms, Great Wyrm Theodorix can be found right outside the Cave Of The Forlorn on the Consecrated Snowfield river. Like all Magma Wyrms, it hits very hard, and makes closing distance rather difficult thanks to its lava attacks and charges. But otherwise, it’s really not as awe-inspiring as its name suggests. It’s basically just another Wyrm.
Misbegotten Crusader (Cave Of The Forlorn)
Putrid Avatar (West Minor Erdtree)
Death Rite Bird (Consecrated Snowfield)
Another Death Rite Bird can be found at night at the point where the frozen river meets the very top edge of the mountains. It spawns as you approach the clearing at the bottom. Again, prepare for a tough fight here. Bring a holy weapon; stay on horseback; and keep Torrent the hell away from those black flames, because they’ll destroy him and you in no time at all.
Black Knife Assassin (Ordina)
Now here’s an interesting one: an entirely invisible Black Knife Assassin stalks the streets of Ordina in the Ordina Evergaol puzzle. The idea isn’t really to defeat this boss. He’s there simply as a sort of environmental obstacle which forces you to jump across rooftops to light the different fires across the town.
Loretta, Knight Of The Haligtree (Haligtree)
Completing the Ordina puzzle allows you access to the Haligtree, one of the most difficult and dangerous regions in Elden Ring. But to enter Elphael, Brace of the Haligtree, you first have to get past Loretta, Knight Of The Haligtree. Fortunately, this Loretta is near-enough identical to the Loretta you faced in Caria Manor back in Liurnia. Obviously this one is much stronger and hits much harder, but the moves are entirely identical.
Putrid Avatar (Elphael)
The challenge of this particular fight is that the platform restricts movement to the sides, which makes it hard to avoid the Avatar’s attack which sends lots of holy light attacks towards you. But apart from this one attack, this fight is fairly straightforward.
Putrid Tree Spirit (Haligtree)
Millicent’s Sisters (Haligtree)
In exactly the same spot as the previously mentioned Putrid Tree Spirit, you can accompany Millicent in her fight against her three sisters if you have progressed to near the end ofMillicent’s questline. Millicent’s Sisters are all fairly powerful invaders, and the main danger is that if Millicent dies, you lose the fight. It can be quite hard to protect Millicent unless you take the attention of at least two sisters at once.
Putrid Avatar (Elphael)
Malenia, Blade Of Miquella (Haligtree)
Elden Ring Boss Guide - Malenia, Blade of MiquellaWatch on YouTube
Elden Ring Boss Guide - Malenia, Blade of Miquella

Many people say that Malenia, Blade Of Miquella is the toughest boss that FromSoftware have ever created. I think she makes for one of the most enjoyable and awe-inspiring fights, with her powerful lifesteal attacks and, later on, her massive AoE blasts of Scarlet Rot. Unfortunately, I beat her first-time with the help of a fully-upgraded Mimic TearSpirit Ash, which means I didn’t get to experience very much of this fight at all.
So if you’re looking for an easy win, I’d suggest using the Mimic Tear like I did, to help tank blows and stun-lock Malenia for easy damage. But if you want the more rewarding route, there’s really nothing I can say beyond: learn her attack patterns well, and prepare for an extended but excellent fight.
Check out ourElden Ring Malenia boss fightwalkthrough for more details.
Elden Ring bosses: Crumbling Farum Azula & Leyndell, Capital Of Ash
Use this map to find out the exact locations of every boss in Crumbling Farum Azula and Leyndell, Capital Of Ash. Be sure to view it atfull resolution!Image credit:Rock Paper Shotgun/Bandai Namco

Mad Tongue Alberich (Roundtable Hold)
Mad Tongue Alberich invades your world if you jump off the balcony into the main hall of the Roundtable Hold. He’s a fairly tricky early-game invader to deal with, thanks to the long reach of his bleed-inflicting scythe and his frost-based spell attacks.
Ensha Of The Royal Remains (Roundtable Hold)
Ancient Dragon (Farum Azula)
Welcome to the first of several Ancient Dragon fights you’ll encounter during your circular journey around Crumbling Farum Azula. It’s a lightning dragon, much like Lansseax and Fortissax from the Altus Plateau and Deeproot Depths respectively, so stay under its legs as much as possible to avoid its dangerous lightning attacks.
Wormface (Farum Azula)
Ancient Dragon (Farum Azula)
Ancient Dragon (Farum Azula)
Ancient Dragon #3 harrasses you as you head north towards the Dragon Temple, but it can only actually be reached later on, once you reach the Dragon Temple itself.
Alexander, Warrior Jar (Farum Azula)
Your good companion Alexander has aquestlinewhich you can follow through multiple areas of the game. At its end, he will appear in the same spot as Ancient Dragon #3. He will challenge you to a duel here. He’s much stronger than other pots you’ve encountered, and you should be particularly careful of his large and impressive AoE attacks. But it shouldn’t take much to bring him down, after which you can speak to him one last time for a good-natured chat before he falls apart.
Ancient Dragon (Farum Azula)
Ancient Dragon #4 can be found asleep just next to the Dragon Temple. It’s on your left as you make your way towards the previous dragon on this list. The fact that it’s asleep means you can get a nice series of attacks on it to initiate the fight, making this fight easier than most.
Godskin Duo (Dragon Temple Altar)
The Godskin Duo are a very nasty pair. One the one hand you have the Godskin Noble, the chunky one who loves to stab with its rapier. On the other you have the Goskin Apostle, the tall, serpentine sickle-wielder. Both have a penchant for black flame attacks, and both are susceptible to bleed attacks, which is pretty much their only weakness. Prepare for a tough fight here.
Check out our Elden RingGodskin Duo boss fight walkthroughfor more details.
Recusant Bernahl (Dragon Temple Rooftop)
After the tough fight against the Godskin Duo, the invasion from Recusant Bernahl at the Dragon Temple Rooftop is a breath of fresh air. He’ll only invade you if you completed all four Volcano Manor contracts (including Bernahl’s own), and then killed Rykard, before reaching Crumbling Farum Azula.
Ancient Dragon (Dragon Temple)
The last (regular) Ancient Dragon you’ll encounter in Crumbling Farum Azula likes to throw lightning at you from miles away, so you’ll need to time your run up towards it. Thankfully, this dragon is more of an environmental hazard than a true enemy, because once you navigate this path and reach it, you’ll find that its health bar is nearly empty already, so a couple of hits should finish it off.
Draconic Tree Sentinel (Dragon Temple)
Behold, the greatest Tree Sentinel of them all. This dangerous Draconic Tree Sentinel guards the entrance to the major boss area of the Dragon Temple. There’s no Torrent to help you steer clear of the Tree Sentinel’s far-reaching attacks, so you’ll need to get very good at reading its attack patterns and dodging at the correct moments - particularly when it starts calling lightning down from the sky upon you.
Dragonlord Placidusax (Dragon Temple)
Check out our Elden RingDragonlord Placidusax boss fightwalkthrough for more details.
Beast Clergyman / Maliketh, The Black Blade (Dragon Temple)
Elden Ring Boss Guide - Beast Clergyman & Malekith, The Black BladeWatch on YouTube
Elden Ring Boss Guide - Beast Clergyman & Malekith, The Black Blade

Just beyond the Draconic Tree Sentinel you must properly fight Gurranq, the Beast Clergyman. He’s a tough old fella, with lots of quick and powerful dagger combos which activate even as he steps backwards, making it difficult to get up close and personal with him. At half-health, he reveals his true identity: Maliketh, The Black Blade.
Maliketh is even nastier than the Beast Clergyman, with plenty of far-reaching magical attacks that leech your health away even if you block them. Fortunately, neither Gurranq nor Maliketh actually have that much health considering they’re an endgame boss.
Check out our Elden RingMaliketh boss fight walkthroughfor more details.
Putrid Tree Spirit x3 (Capital Of Ash)
Once Leyndell has become the Ashen Capital, if you approach the city starting from the Forbidden Lands Site of Grace to the east, and follow that path to its end, you’ll find a sandy area which was once filled with water. Here, a Putrid Tree Spirit stalks the area, guarding the powerful Erdtree’s Favour +2talisman. But hidden in the sand are two more Putrid Tree Spirits, making this fight far more challenging that it might first appear.
These Tree Spirits hit very hard, and it can be difficult to keep multiple in sight at once. Fortunately, the silver lining is that they can damage each other as well, and it’s fairly easy to make them do so, given their erratic movements which often lead them into each other’s paths.
Sir Gideon Ofnir, The All-Knowing (Erdtree Sanctuary)
After defeating Maliketh, you’re transported to Leyndell, now the Capital of Ash. Upon reaching the Erdtree Sanctuary (where you previously fought the spirit of Godfrey), you’ll come face to face with Sir Gideon once more - this time as an enemy intent on stopping you from becoming Elden Lord.
Thankfully, Gideon is an absolute pushover compared to the other endgame Elden Ring bosses. What sets him apart from other Tarnished enemies is his range of powerful sorceries, which you’ll have to time your dodges well to avoid. He can be easily interrupted, and you can pile on the pressure with ease against him once you’re in melee range.
Godfrey, First Elden Lord / Hoarah Loux, Warrior (Elden Throne)
Elden Ring Boss Guide - Godfrey, First Elden Lord & Hoarah Loux, WarriorWatch on YouTube
Elden Ring Boss Guide - Godfrey, First Elden Lord & Hoarah Loux, Warrior

One of my favourite fights in Elden Ring is also against one of the very strongest adversaries you’ll ever face: Godfrey, First Elden Lord. He’s like an evolved Godrick from Stormveil Castle, with foot-slam attacks and a massive axe that he uses in savage combos with strange timings designed to catch you off-guard. Once he starts doing shockwave attacks, you should either dodge through or jump over them.
At 40% health, Godfrey will reveal his true identity: Hoarah Loux, Chieftain of the Badlands. Ditching his axe, he instead opts for hand-to-hand combat, unleashing some absolutely devastating grab attacks which make it very scary for a melee player to stay up close to him. You’ll have to get very good at dodging to prevail against this incredibly powerful foe.
Check out our Elden RingGodfrey boss fight walkthroughfor more details.
Radagon Of The Golden Order / Elden Beast (Fractured Marika)
Elden Ring Boss Guide - Radagon Of The Golden Order & Elden BeastWatch on YouTube
Elden Ring Boss Guide - Radagon Of The Golden Order & Elden Beast

Past the unbreachable thorns of the Erdtree you’ll face the final boss of Elden Ring: the incredibly powerful Radagon, of the Golden Order. This lengthy fight will involve an awful lot of dodging, as Radagon loves to use very large AoE holy attacks which keep you from getting close. This means increasing your holy damage negation is a very good idea for this fight. Particularly useful is the Haligtree +2 Talisman you can find in one of the graveyards outside Mohgwyn Palace.
Deal enough damage to Radagon and he will collapse, prompting the appearance of the colossal and frightening Elden Beast. Fortunately, compared with Radagon, the Elden Beast is very easy once you understand what it’s doing. Dodge its large sword-swings, and get out of the way of the large magical circles which appear around you when it floats into the air. Beyond that, this section of the fight is surprisingly simple: the hard part is defeating the mighty Radagon in order to reach it.
Check out ourRadagon boss fightwalkrthough and ourElden Beast boss fight walkthroughfor more details.
If you’re looking to prepare yourself for the daunting task of felling all these adversaries, be sure to check out our guides on where to find thebest weaponsandarmourin Elden Ring early on.
