HomeGuidesBlack Myth: Wukong
Black Myth Wukong Chapter 2 mapUse our Chapter 2 map of Black Myth Wukong to make sure you don’t miss a thing
Use our Chapter 2 map of Black Myth Wukong to make sure you don’t miss a thing
Image credit:Rock Paper Shotgun
Image credit:Rock Paper Shotgun

What does a Chapter 2 map for Black Myth: Wukong look like?If your answer is “a goddamn jumble of chaos”, then you’re in the right ballpark. Chapter 2’s environment is one of the least linear and most confusing inBlack Myth: Wukong, with multiple paths to various locations, several one-way connections between regions, and a whole heap of secrets to discover.
To help you make sense of everything that’s going on, we’ve put together the belowBlack Myth: Wukong Chapter 2 map, which guides you through the entire Chapter from start to end, highlighting all the important bosses and collectibles you can find along every path to ensure you never feel lost or wanting for anything during your stint in the desert.
Black Myth Wukong Chapter 2 map
Here is our complete Chapter 2 map for Black Myth: Wukong:
Keep track of your progress through the Yellow Wind Ridge with our handy abstract Chapter 2 map! |Image credit:Rock Paper Shotgun
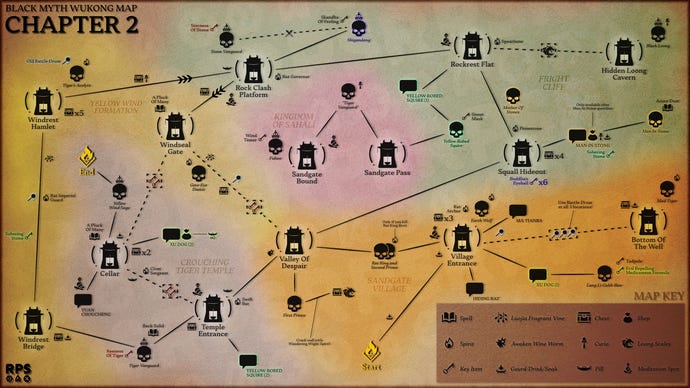
View the full resolution map here:Black Myth: Wukong Chapter 2 map
Below we’ll list the various regions of Chapter 2 of Black Myth: Wukong in greater detail, to help you make even more sense of the above map and ensure you’re never lost or searching randomly for any particular item or point of interest.
View our other Black Myth: Wukong maps here!
To see this content please enable targeting cookies.Manage cookie settings
To see this content please enable targeting cookies.Manage cookie settings
Sandgate Village
Sandgate Village is your first stop in Chapter 2, and acts like a microcosm of Chapter 2 in general, with its blocked entrances and roundabout shortcuts to different seemingly disconnected areas. There’s a lot to discover in the Village Entrance area alone, including three (count them) NPCs, twoSpirits, and two bosses to fight. Neither of them are terribly difficult, thankfully.
Crouching Tiger Temple
Once you defeat theKing Of Flowing Sands and the Second Prince, you have two paths ahead of you. The gate in the middle is blocked, so you need to take either the left path (to Crouching Tiger Temple) or the right path (to Fright Cliff). The order is up to you, although taking the left path first seems to flow a little better to me.
The left path takes you through a cave, in which you’ll find theFirst Princeboss. You should take the time to break the manmade wall in this boss arena with the Wandering Wight Spirit or other hard-hitting attack, because behind it is the Loong Scales item which you can use to unlock all the Loong bosses hidden throughout the various Chapters of Black Myth (including Chapter 1!). After that, head through the cave to reach the Crouching Tiger Temple - home to the powerfulTiger Vanguardboss.
The next step after defeating the Tiger Vanguard is likely to head into the Yellow Wind Formation beyond, although there’s one more section of the Temple: the Cellar. You can only unlock the Cellar after defeating both the Tiger VanguardandtheStone Vanguard. Once you’ve done that, interact with the Tally at the back of the Tiger Vanguard arena to unlock the Cellar, which is essentially a shortcut to the final boss of Chapter 2.
Yellow Wind Formation
Both the Yellow Wind Formation and the Fright Cliff (coming up next) converge at the end - at the location of the Stone Vanguard andShigandangboss arena. Which may be confusing if you’re not prepared for it. So be prepared!
Fright Cliff
Cross the bridge from the Valley Of Despair back in Sandgate Village, and you’ll reach Fright Cliff. There are three whole questlines which take place predominantly in this region:
Of all the encounters in this region, the most dangerous is probably theBlack Loong, which you can find behind the “sand waterfall” in Rockrest Flat once you obtain the Loong Scales from the cave in front of the Crouching Tiger Temple.
Secret: Kingdom Of Sahālī
Before you tackle the final boss in the Cellar of the Crouching Tiger Temple, there’s one more region to explore - the Kingdom Of Sahālī. This is Chapter 2’s secret area, and is only unlocked once you complete the Drunken Boar’s questline (linked above). Proceed past the fight with theYellow-Robed Squire, and he’ll let you through the door at the back of Rockrest Flat and into the wide-open Kingdom Of Sahālī region.
Aside from the two bosses found here - the"Tiger Vanguard"andFuban- keep your eyes peeled for a Meditation Spot on the left side of the Sandgate Bound region.
That wraps up our guide on the Chapter 2 map in Black Myth: Wukong, so hopefully you now know your way around Yellow Wind Ridge like the back of your monkey’s paw. While you’re here, check out our guides on thebest weapons,best armor, andbest curiosto use in Black Myth: Wukong, along with our guide on theBlack Myth: Wukong Journalto help you track down every last entry!
