HomeGuidesElden Ring
All dungeon locations in Elden Ring: Shadow Of The ErdtreeHere is how to get to each and every dungeon in Shadow Of The Erdtree
Here is how to get to each and every dungeon in Shadow Of The Erdtree
Image credit:Rock Paper Shotgun/Bandai Namco
Image credit:Rock Paper Shotgun/Bandai Namco
Looking for all dungeon locations in Elden Ring: Shadow Of The Erdtree?Like in theElden Ringbase game,Shadow Of The Erdtreeoffers optional dungeons for players to complete in return for unique rewards likeweapons,Spirit Ashesand more.
Shadow Of The Erdtree has15 optional dungeonsin total with different optional bosses. This includes four Nameless Mausoleums scattered across the Land of Shadow. For a rundown of each dungeon location and the steps needed to get there, read on.
To see this content please enable targeting cookies.Manage cookie settings
To see this content please enable targeting cookies.Manage cookie settings
All dungeon locations in Shadow Of The Erdtree
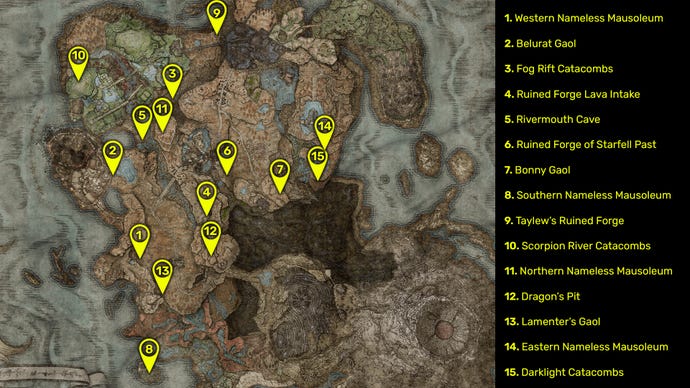
The following map depicts all dungeon locations in Shadow Of The Erdtree. Below, we’ve gone into further detail on each dungeon, with key rewards highlighted as well as instructions on how to get to the area it is located in.
We’ve listed the dungeons in roughorder of locationdifficulty as a guide to help you as you progress.
Here are all 15 dungeon locations in Shadow Of The Erdtree. |Image credit:Rock Paper Shotgun/Bandai Namco
1. Western Nameless Mausoleum
Although this dungeon can be accessed right away, the Blackgaol Knight can be a tricky boss. |Image credit:Rock Paper Shotgun/Bandai Namco
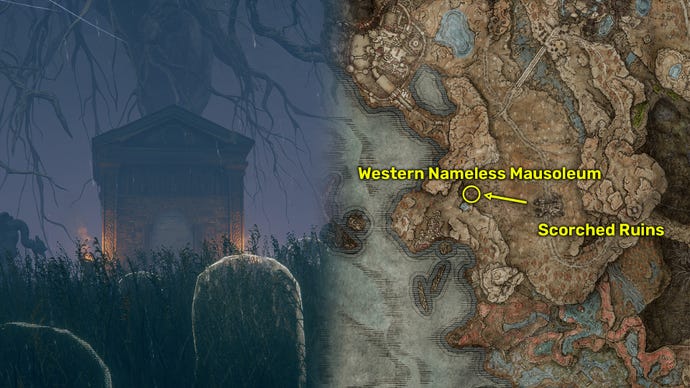
The Western Nameless Mausoleum is located within the starting Gravesite Plain area,northwest of the Scorched Ruins(the first major structure you’re likely to come across). As such, it can be accessed as soon as you enter the DLC.
See our guide to beating theBlackgaol Knightfor more tips and tricks.
2. Belurat Gaol
Belurat Gaol is full of Shadow men and Living Jars. |Image credit:Rock Paper Shotgun/Bandai Namco
The next dungeon you’re likely to encounter on this list is the Belurat Gaol, located on theoutskirts of the Belurat, Tower Settlement(the first major legacy dungeon of the DLC).
The boss of this dungeon is a Demi-Human that should be fairly easy to take on. Onze is weak against Slash, Fire, Poison andScarlet Rotbuild-up. Once defeated, he will drop the Demi-Human Swordsman Yosh Spirit Ashes and 80,000 Runes.
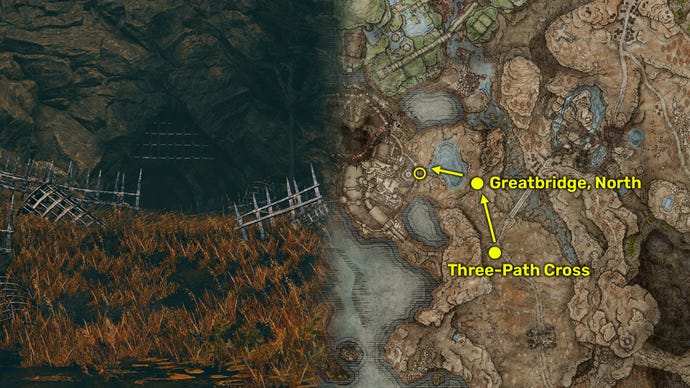
3. Fog Rift Catacombs
The Fog Rift Catacombs are full of Fanged Imps, so be careful of Bleed buildup damage. |Image credit:Rock Paper Shotgun/Bandai Namco
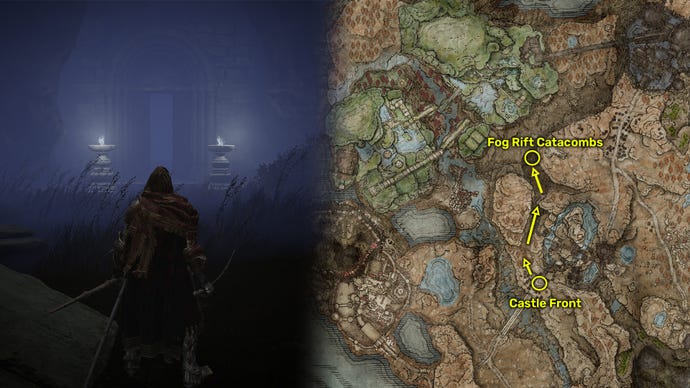
The Fog Rift Catacombs are also fairly easy to locate early on in a Shadow Of The Erdtree playthrough. From outsideCastle Ensisat the Castle Front Site Or Grace,travel slightly north(or left of the main stairs) and drop down to the valley below.
Insidethe dungeon, you’ll need to work your way down and do a bit of light platforming across spiked trap ceilings to reach the boss, the Death Knight. We have a full walkthrough of theFog Rift Catacombsfor more information on taking the dungeon and its boss on. Essentially, the Death Knight is weak to Holy damage and almost completely immune to blood loss buildup.
4. Ruined Forge Lava Intake
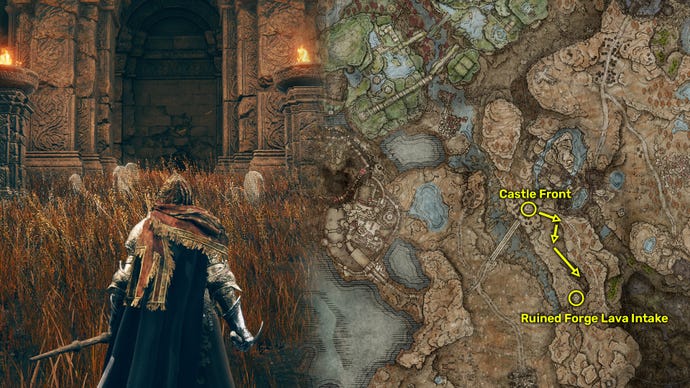
To get to the Ruined Forge Lava Intake, take the maineastern road from the Castle FrontSite Of Grace outside Castle Ensis. When the path curves uphill, walk downhill to the south instead. Travel along the valley, past the Messmer Soldier’s barriers and along the dirt path around the trolls battling the rest of the soldiers.
You’ll see a wall up ahead with several large torches. Head inside the hole in the wall to access the dungeon. Inside, you’ll need to work your way through the dungeon and reach the lever to raise the large main pipe. There is no end boss here, but several tough Golem Smith enemies.
Your rewards will be on an altar to the side of the pipe. For more information, see ourRuined Forge Lava Intakewalkthrough.
5. Rivermouth Cave
Climb behind the wolf’s den to access the hidden subterranean level of this cave. |Image credit:Rock Paper Shotgun/Bandai Namco
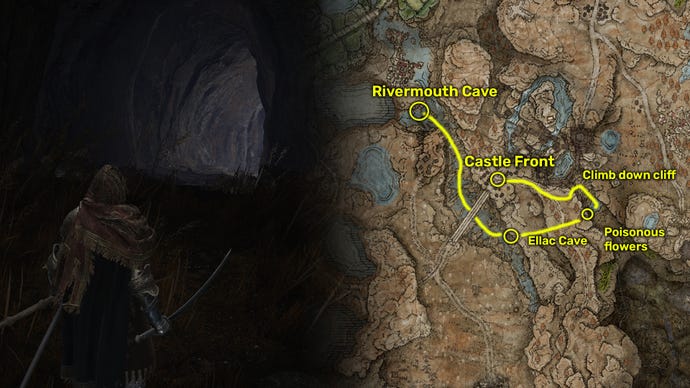
The Rivermouth Cave is initially a wolf’s den that, when descended into, leads into a subterranean cavern full of worshipping Bloodfiends. To get to the Rivermouth Cave, you musttravel from Castle Ensis to the lake below.
Take the eastern road from the Castle Front Site Of Grace and approach the cliffside where there will be a Messmer Soldier looking out on the view. Platform down the cliffside here, using the rocks as support.
Follow the water and keep heading northwest past the many flies. The cave will be up ahead. Inside is a fairly straightforward and short dungeon where you will face the Chief Bloodfiend boss. He is strong against Blood loss and Fire but weak against Frost, Scarlet Rot, Poison and Slash attacks.
6. Ruined Forge of Starfell Past
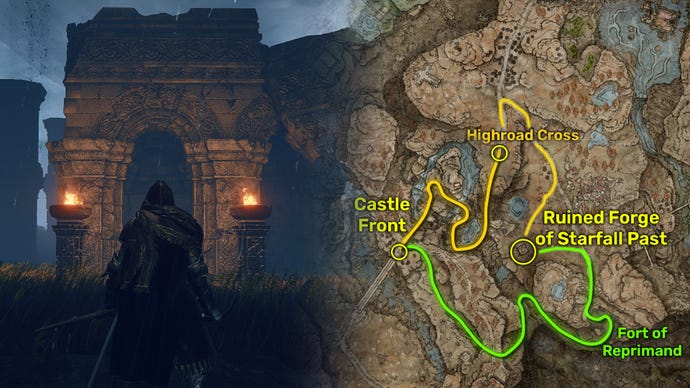
The Ruined Forge of Starfell Past is located withinScadu Altus, southwest along the main roadfrom the Highroad Cross Site Of Grace. To access the dungeon and the Scadu Altus region in general, you need to either complete your way through Castle Ensis and defeat the boss therein or take the route from the Fort of Reprimand southeast from the castle (ride up both Spiritsprings from the eastern path).
As it is another Forge, there is no end boss to this dungeon, but it will be littered with Golem Smiths. The key aim of this dungeon is to locate the various levers which will raise the doors in the dungeon. Once you have raised the door in the main room, take an immediate right and use the hidden lever to raise it again. Jump on top of the door as it starts to ascend and it will take you to the platform where the altar and dungeon rewards lie.
7. Bonny Gaol
Travel underneath Moorth Ruins to discover Bonny Village and the secrets therein. |Image credit:Rock Paper Shotgun/Bandai Namco
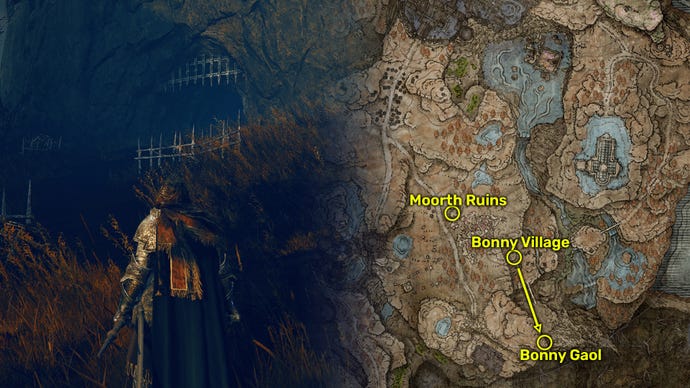
Bonny Gaol is located across abridge to the south of Bonny Village. From the Bonny Village Site Of Grace, travel down to the south and go across the wooden greatbridge. Continue forward past the empty cages that mark the entrance into the gaol (watch out for the giant scorpions guarding outside).
If you have yet to access Bonny Village, you must go through the Moorth Ruins in Scadu Altus and follow them around until you encounter a ladder. Going up the ladder will result in you exiting via the Bonny Village well. From here, you can access the eastern region of Scadu Altus, the church District and the Cathedral of Manus Metyr.
Inside Bonny Gaol you’ll encounter more Living Jar enemies and the Curseblade Labirith boss. This boss is fast but not too difficult to take down if you remember he is weak against Slash attacks and Sleep buildup. See ourBonny Gaol walkthroughfor more tips and tricks about this dungeon.
8. Southern Nameless Mausoleum
The route to this Mausoleum will take you across the idyllic Cerulean Coast. |Image credit:Rock Paper Shotgun/Bandai Namco
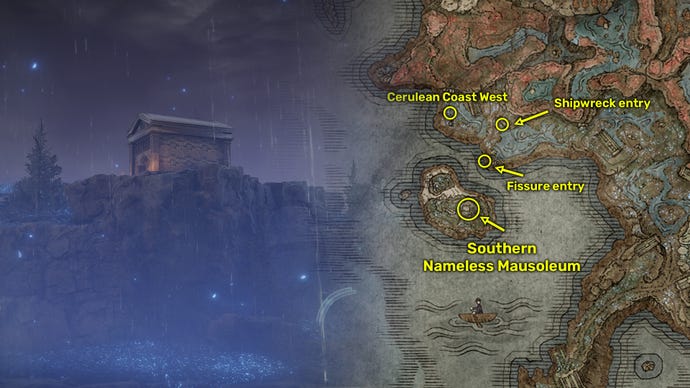
The next Nameless Mausoleum to visit on this list is located on theisland off the westernCerulean Coast. To access the area, you’ll need to enter ahidden passagewhich will take you underground and onto the island.
From the Cerulean Coast West Site Of Grace, travel south and follow the coastline around. You’ll see a bunch of Shadow enemies praying and crying over a funeral mound of headstones. Walk off the cliff edge opposite them to the level below. Here, there will be a fissure in the ground that you can platform down.
Once you’re at the bottom of the fissure, make your way through the cave southwest. Upon exiting the cave, you’ll be on the island where the Southern Nameless Mausoleum is located. You can also access this cave and the entryway into the island via a cave opposite a large shipwreck east of the Cerulean Coast West Site Of Grace.
As with the other Mausoleums, you won’t be able to summon a Spirit Ash once inside. The boss is the Dancer of Ranah, who is exceptionally quick, but vulnerable to Strike and Pierce damage and can be parried for a potential critical hit.
9. Taylew’s Ruined Forge

Taylew’s Ruined Forge is located at theRauh Base, almost directlynorth of the Ancient Ruins Base Site of Grace. You’ll know you’re in the right place when you see a bunch of demi-humans mining outside of a large structure with lit torches.
To get to Rauh Base, you need to enter a secret cave in Scadu Altus. From Moorth Ruins, travel northeast towards a bunch of glowing worms in a pool. Travel past these and a statue of Marika to a cave opening. Go through the cave and you should find yourself in a poisonous pond decorated with numerous Gravebirds.
From here, go past the Gravebirds and travel around the water northeast until you come to a cliff edge. Continue forwards and you’ll be at Rauh Base. Now, travel forwards to discover the Ancient Ruins Base Site Of Grace.
10. Scorpion River Catacombs
As the name would suggest, look out for the Scorpions guarding the entrance of this dungeon. |Image credit:Rock Paper Shotgun/Bandai Namco
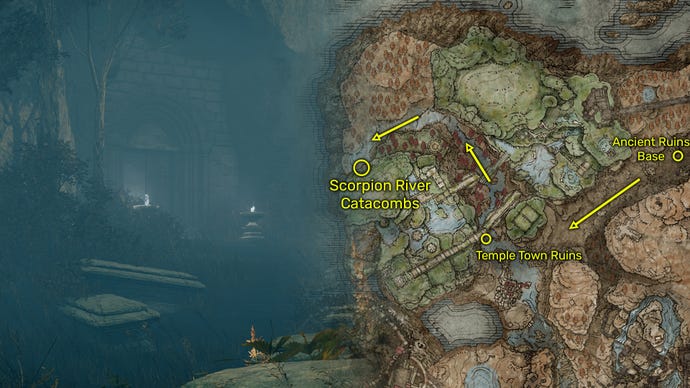
From the Temple Town Ruins Site Of Grace, simply follow the river north and around. Take caution as you pass the Kindred Of Rot enemies and the flying scorpions. Eventually, you will start to see stone coffins and various Vulgar Militiamen. Complete the journey around the lake and you’ll come to the dungeon entrance.
Inside the Scorpion River Catacombs, you’ll need to fight yet another Death Knight. This one is much like the last and will drop the Death Knight’s Longhaft Axe and Cerulean Amber Medallion +3. The main danger of these catacombs is the various Basilisk enemies that inflict Death Blight (which can instantly kill). We recommend stocking up on Rejuvenating Boluses to combat this unless you have access to the Order Healing or Law of Regression Incantations.
11. Northern Nameless Mausoleum
You’ll need to travel up two Spiritsprings to get to the Northern Nameless Mausoleum. |Image credit:Rock Paper Shotgun/Bandai Namco
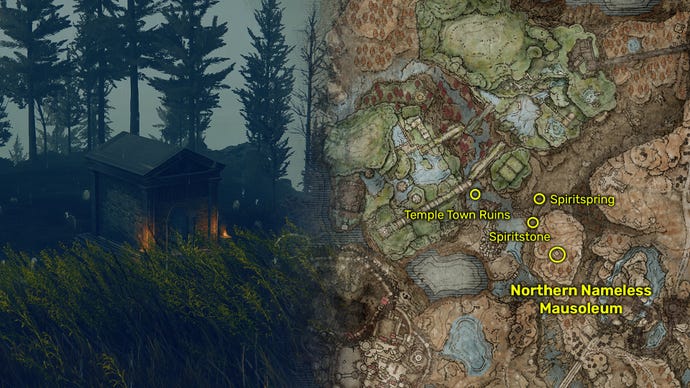
Whilst we’re at Rauh Base, now is the perfect time to visit the Northern Nameless Mausoleum. This Mausoleum is located on ahigh platform above Rauh Base, accessible via two consecutive Spiritsprings (one of which is sealed).
Inside the Mausoleum, you’ll face Red Bear who is exceptionally fast and can deal Bleed buildup damage. Although strong against Holy, Bleed and Frost he is vulnerable to Lightning damage.
12. Dragon’s Pit
The Dragon’s Pit is the gateway into the Jagged Peak region. |Image credit:Rock Paper Shotgun/Bandai Namco
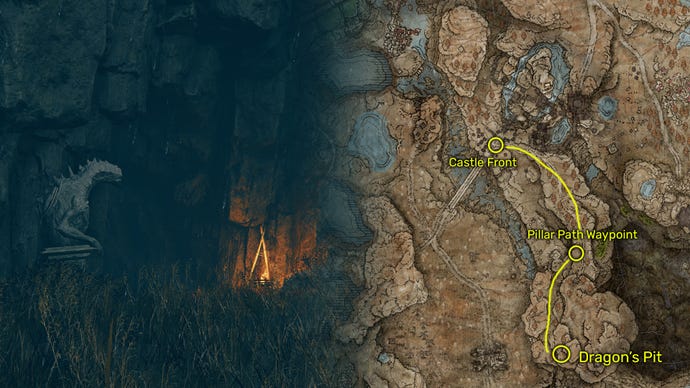
Although the Dragon’s Pit can be accessed fairly quickly, it is usually best left until later in your DLC playthrough as it effectively acts as the gateway into the Jagged Peak region. This is a high-level area bustling with Dragons and Drakes.
You’ll need to visit this region, however, if you’re looking to completeIgon and the Dragon Communion Priestess' questlines. To access the Dragon’s Pit, simply take thesoutheastern road from the Castle FrontSite Of Grace outside Castle Ensis in the Gravesite Plain.
On this road, you’ll also encounter the invasion form of the Ancient Dragon-Man. You’ll need to defeat this as well as the real thing at the end of this dungeon. See ourDragon’s Pit walkthroughfor more information.
13. Lamenter’s Gaol
Lamenter’s Gaol isn’t too far from Charo’s Hidden Grave. |Image credit:Rock Paper Shotgun/Bandai Namco

From the first Jagged Peak Site Of Grace outside the Dragon’s Pit exit, travel along the southern road to the Grand Altar of Dragon Communion. Essentially, you need to climb across the body of the giant dead dragon to gain access to the Hidden Grave region. Aim to cross his foot and ankle southwest; this will take you to a ledge. Jump from this ledge and you’ll end up in a grove filled with red flowers and ponds.
From the Charo’s Hidden Grave Site Of Grace, travel forward northwest (watching out for the Death Rite Bird boss) and follow the river west. Drop down two waterfalls and you’ll receive the message that you’re now in the Gravesite Plain. Continue forward, past the scattered cages that mark the dungeons entrance.
Inside Lamenter’s Gaol, you’ll need to make your way down the dungeon to face the Lamenter boss. He isn’t too dangerous, but does have the power to summon multiple copies of himself, which can be tricky. Once you locate the true Lamenter, he is weak against Lightning and Physical damage and strong against Holy, Fire and Magic.
14. Eastern Nameless Mausoleum
Rakshasa’s Great Katana is worth the trip to the Eastern Nameless Mausoleum. |Image credit:Rock Paper Shotgun/Bandai Namco
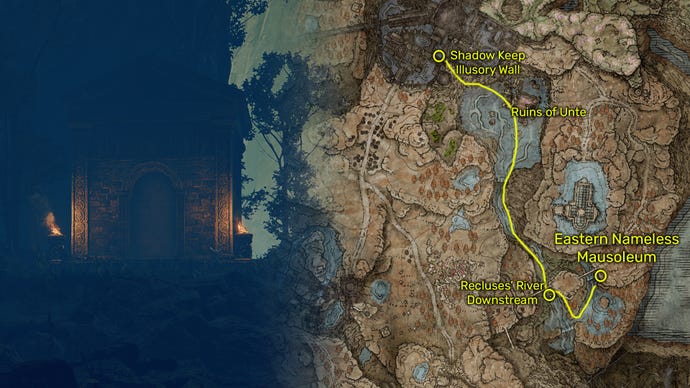
If you have yet to discover this region, you must travel to The Shadow Keep in Scadu Altus and advance through the area until you reach the grand staircase foyer area that leads to the large Specimen Storehouse lift. Take the ladder right of the staircase to the lower water level of the keep.
From this Site Of Grace, walk east to the cliff edge and you’ll see a bunch of stone platforms. Climb down until you hit the waterfall below. Instead of continuing down the stone platforms, turn north and follow the river around until you see the Mausoleum.
Inside the Mausoleum, Rakshasa awaits. He is especially vulnerable after a parry and against Lightning damage. Once defeated, you’ll get one of the best katanas in the DLC, Rakshasa’s Great Katana.
15. Darklight Catacombs
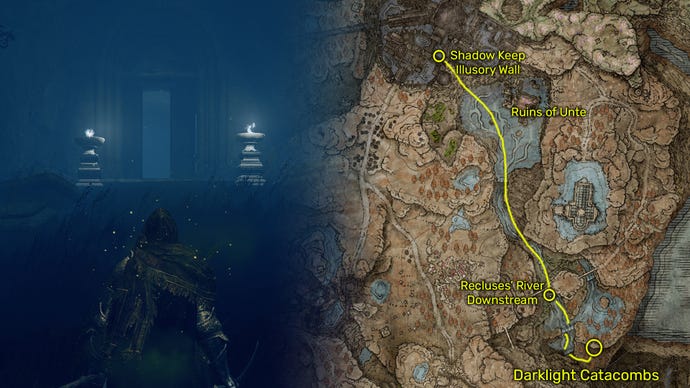
The Darklight Catacombs are alsolocated in the depths. From the Recluses' River Downstream Site Of Grace travel down the stone platforms over the eastern cliffedge. This time, take them all the way down past the waterfall and onto the lower level. Walk towards the next waterfall to the southeast and you’ll see another row of platforms. Take these down and then walk directly east. There will be a few Vulgar Militiamen to watch out for but if you follow the two blue lights you should get to the dungeon entrance.
The key thing to understand about the Darklight Catacombs is that you must light four torches (via four separate levers) to restore power to the area and advance to the boss. The boss in question is Jori, Elder Inquisitor who can be a bit tricky due to his inclination of summoning more enemies to the battle. Try to take him out quickly and remember he is weak against Slash and Fire damage.
That rounds up our guide on all dungeon locations in Elden Ring: Shadow Of The Erdtree. For more Elden Ringtips and tricks, check out our guide to thebest early weaponsin Shadow Of The Erdtree to get you started. Or, if you’re further along in the DLC, see ourbest weaponsguide that goes through the best of the bunch. Be sure to also check out ourMap Fragment locationsguide to help you access and uncover every region in the DLC and see ourboss locationsguide so you won’t miss a single one.
